By: Team Rolodex Since: Sep 2017 Licence: MIT
- 1. Introduction
- 2. Setting Up
- 3. Design
- 4. Implementation
- 4.1. Undo/Redo Mechanism
- 4.2. Open File and New File Mechanism
- 4.3. Fuzzy Finding Mechanism
- 4.4. Sorting Mechanism
- 4.5. Abbreviation Mechanism
- 4.6. Drop-down List of Possible Commands
- 4.7. Auto-completion Mechanism
- 4.8. Keyboard Shortcuts Mechanism
- 4.9. Auto-complete Command Shortcuts
- 4.10. Person Detail Panel
- 4.11. UI Improvements
- 4.12. Help Window Highlighting
- 4.13. Composing Emails
- 4.14. Suggestions Mechanism
- 4.15. Logging
- 4.16. Configuration
- 5. Documentation
- 6. Testing
- 7. Dev Ops
- Appendix A: Suggested Programming Tasks to Get Started
- Appendix B: User Stories
- Appendix C: Use Cases
- Appendix D: Non Functional Requirements
- Appendix E: Glossary
1. Introduction
Rolodex is a desktop contact management application for users who prefer working without a mouse to manage their contacts more efficiently. It is useful for busy people who have many connections, such as a businessmen with a list of clients to remember, or a teacher who wants to organize their student information.
The Developer Guide will walk you through the design, implementation and development environment of Rolodex. This is the go-to page for all your information needs in understanding our application.
2. Setting Up
This section will guide you in setting up the Rolodex project in your local machine for the first time.
2.2. Setting up the Project in Your Computer
-
Fork this repo, and clone the fork to your computer
-
Open IntelliJ (if you are not in the welcome screen, click
File>Close Projectto close the existing project dialog first) -
Set up the correct JDK version for Gradle
-
Click
Configure>Project Defaults>Project Structure -
Click
New…and find the directory of the JDK
-
-
Click
Import Project -
Locate the
build.gradlefile and select it. ClickOK -
Click
Open as Project -
Click
OKto accept the default settings -
Open a console and run the command
gradlew processResources(Mac/Linux:./gradlew processResources). It should finish with theBUILD SUCCESSFULmessage.
This will generate all resources required by the application and tests.
2.3. Verifying the Setup
-
Run the
seedu.address.MainAppand try a few commands -
Run the tests to ensure they all pass.
2.4. Configurations to Do Before Writing Code
Before you start coding, there are some important configurations that you have to do for the project to run smoothly.
2.4.1. Configuring the Coding Style
This project follows oss-generic coding standards. IntelliJ’s default style is mostly compliant with ours but it uses a different import order from ours. To rectify,
-
Go to
File>Settings…(Windows/Linux), orIntelliJ IDEA>Preferences…(macOS) -
Select
Editor>Code Style>Java -
Click on the
Importstab to set the order-
For
Class count to use import with '*'andNames count to use static import with '*': Set to999to prevent IntelliJ from contracting the import statements -
For
Import Layout: The order isimport static all other imports,import java.*,import javax.*,import org.*,import com.*,import all other imports. Add a<blank line>between eachimport
-
Optionally, you can follow the UsingCheckstyle.adoc document to configure Intellij to check style-compliance as you write code.
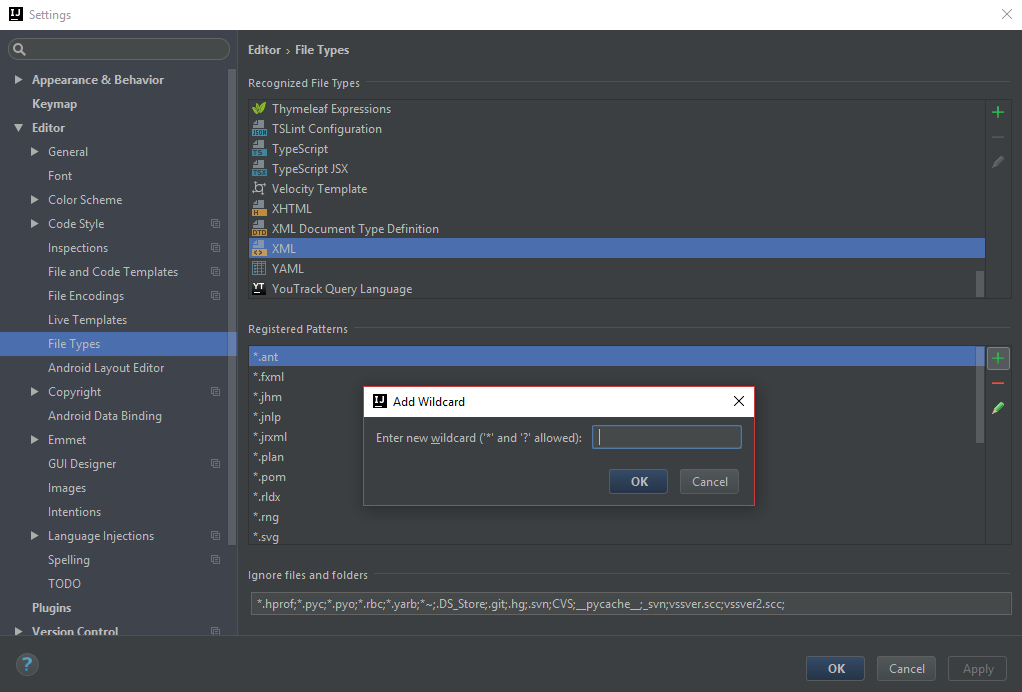
2.4.2. Configuring Rolodex .rldx Extensions
Rolodex files are associated with the .rldx extensions and are an extension of xml. To configure xml tools in intellij for rldx files,
-
Go to
File>Settings…(Windows/Linux), orIntelliJ IDEA>Preferences…(macOS) -
Select
Editor>File Types -
Under
Recognized File Types, highlight theXMLoption -
In the lower tab under registered patterns, click
+on the side. A new prompt should appear as seen in the picture below -
Enter
.rldxand clickok, then clickapply
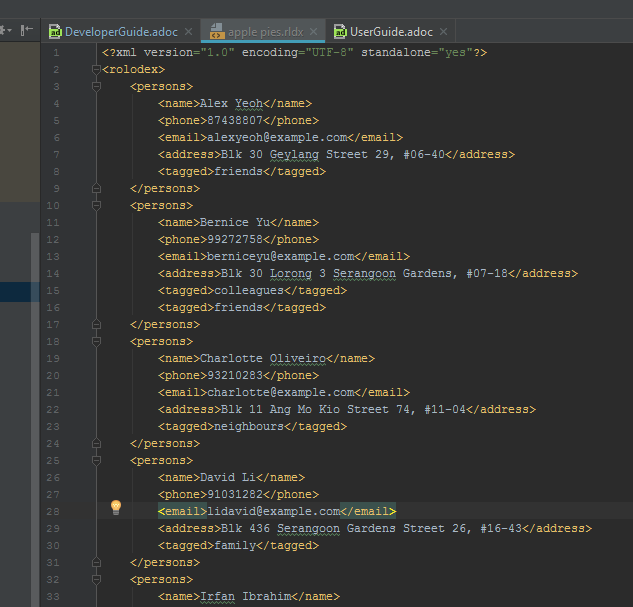
If you can get syntax highlighting as seen below, you are successfully configured to use .rldx files with intellij.
2.4.3. Updating Documentation to Match Your Fork
After forking the repo, links in the documentation will still point to the se-edu/addressbook-level4 repo. If you plan to develop this as a separate product (i.e. instead of contributing to the se-edu/addressbook-level4) , you should replace the URL in the variable repoURL in DeveloperGuide.adoc and UserGuide.adoc with the URL of your fork.
2.4.4. Setting up CI
Set up Travis to perform Continuous Integration (CI) for your fork. See UsingTravis.adoc to learn how to set it up.
Optionally, you can set up AppVeyor as a second CI (see UsingAppVeyor.adoc).
| Having both Travis and AppVeyor ensures your App works on both Unix-based platforms and Windows-based platforms (Travis is Unix-based and AppVeyor is Windows-based) |
2.4.5. Getting Started With Coding
When you are ready to start coding,
-
Get some sense of the overall design by reading the Architecture section.
-
Take a look at the section Suggested Programming Tasks to Get Started.
3. Design
To help you better understand the internal design of the application, this section provides model diagrams with accompanying explanations for the main architecture of Rolodex.
3.1. Architecture
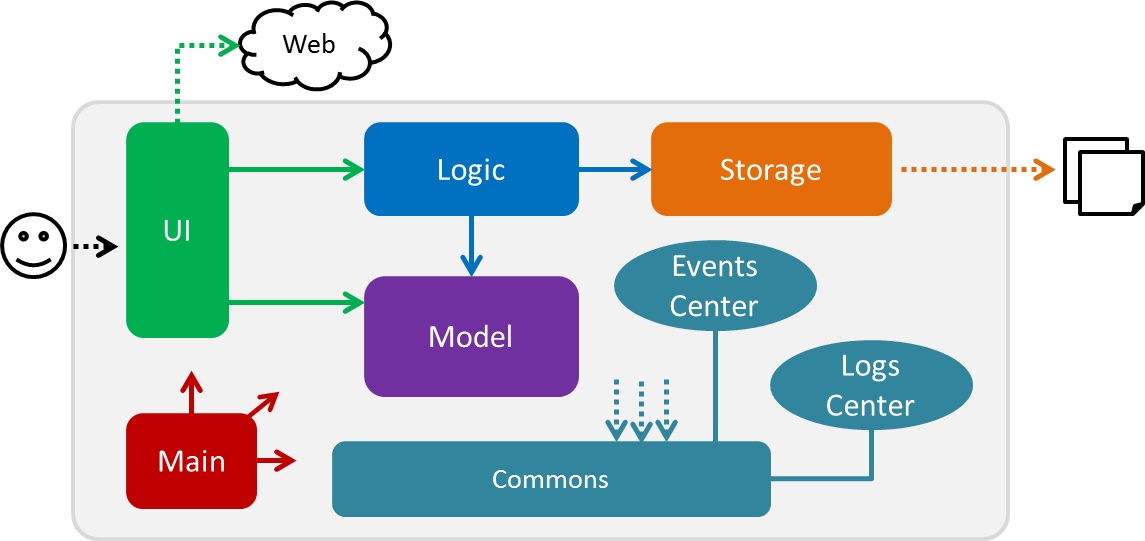
The Architecture Diagram given above explains the high-level design of the App. Given below is a quick overview of each component.
The .pptx files used to create diagrams in this document can be found in the diagrams folder. To update a diagram, modify the diagram in the pptx file, select the objects of the diagram, and choose Save as picture.
|
Main has only one class called MainApp. It is responsible for,
-
At app launch: Initializes the components in the correct sequence, and connects them up with each other.
-
At shut down: Shuts down the components and invokes cleanup method where necessary.
Commons represents a collection of classes used by multiple other components. Two of those classes play important roles at the architecture level.
-
EventsCenter: This class (written using Google’s Event Bus library) is used by components to communicate with other components using events (i.e. a form of Event Driven design) -
LogsCenter: Used by many classes to write log messages to the App’s log file.
The rest of the App consists of four components.
Each of the four components
-
Defines its API in an
interfacewith the same name as the Component. -
Exposes its functionality using a
{Component Name}Managerclass.
For example, the Logic component (see the class diagram given below) defines it’s API in the Logic.java interface and exposes its functionality using the LogicManager.java class.
Above is the Class Diagram of the logic component.
Events-Driven Nature of the Design
The Sequence Diagram below shows how the components interact for the scenario where the user issues the command delete 1.
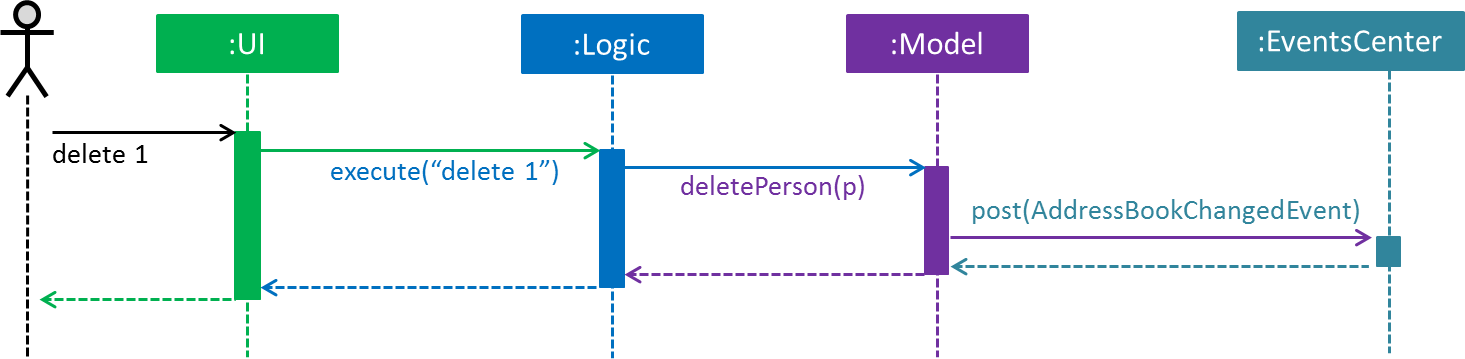
Note how the Model simply raises a RolodexChangedEvent when the Rolodex data are changed, instead of asking the Storage to save the updates to the hard disk.
|
The diagram below shows how the EventsCenter reacts to that event, which eventually results in the updates being saved to the hard disk and the status bar of the UI being updated to reflect the 'Last Updated' time.
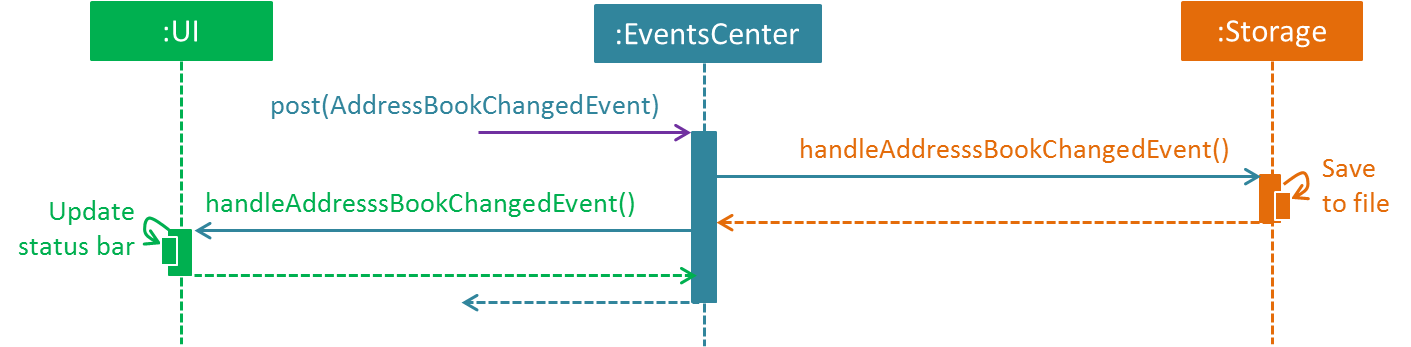
Note how the event is propagated through the EventsCenter to the Storage and UI without Model having to be coupled to either of them. This is an example of how this Event Driven approach helps us reduce direct coupling between components.
|
The sections below give more details of each component.
3.2. UI Component
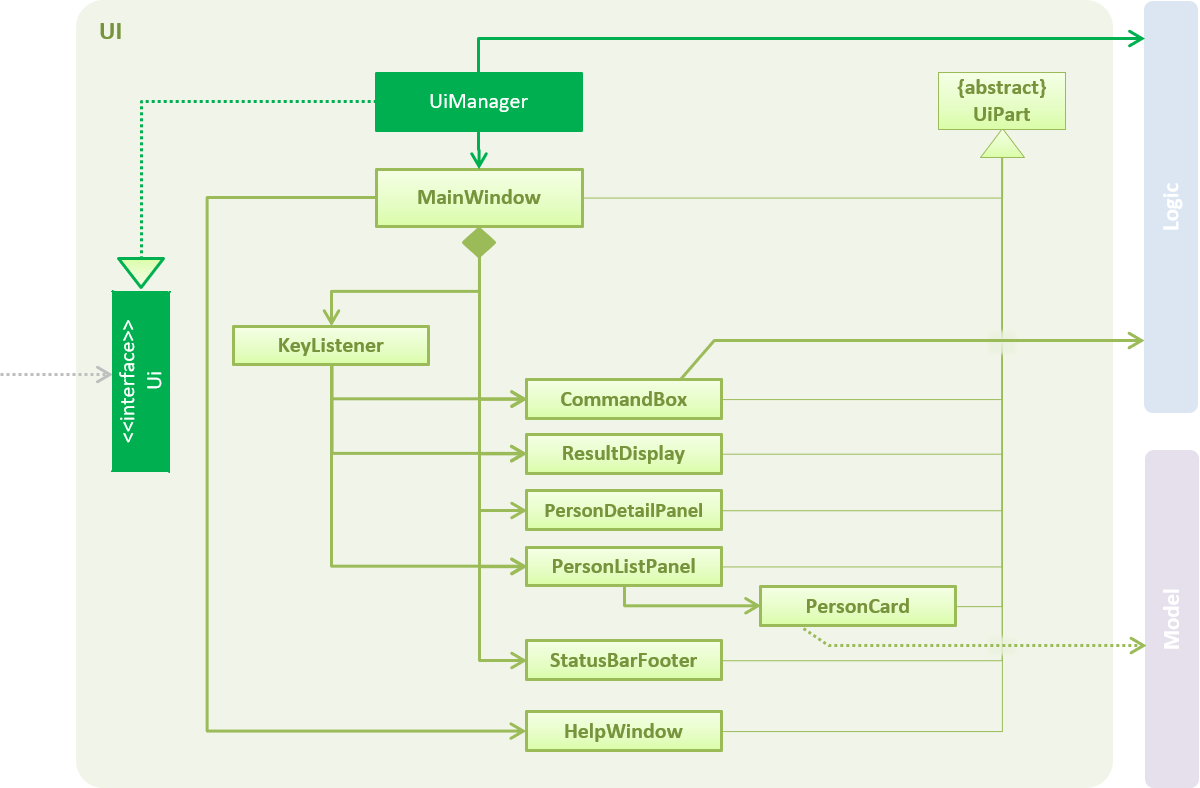
Structure of the UI component is shown in the above diagram.
API : Ui.java
The UI consists of a MainWindow that is made up of parts e.g.CommandBox, ResultDisplay, PersonListPanel, StatusBarFooter, BrowserPanel etc. All these, including the MainWindow, inherit from the abstract UiPart class.
The UI component uses JavaFx UI framework. The layout of these UI parts are defined in matching .fxml files that are in the src/main/resources/view folder. For example, the layout of the MainWindow is specified in MainWindow.fxml
The UI component,
-
Executes user commands using the
Logiccomponent. -
Binds itself to some data in the
Modelso that the UI can auto-update when data in theModelchange. -
Responds to events raised from various parts of the App and updates the UI accordingly.
3.3. Logic Component
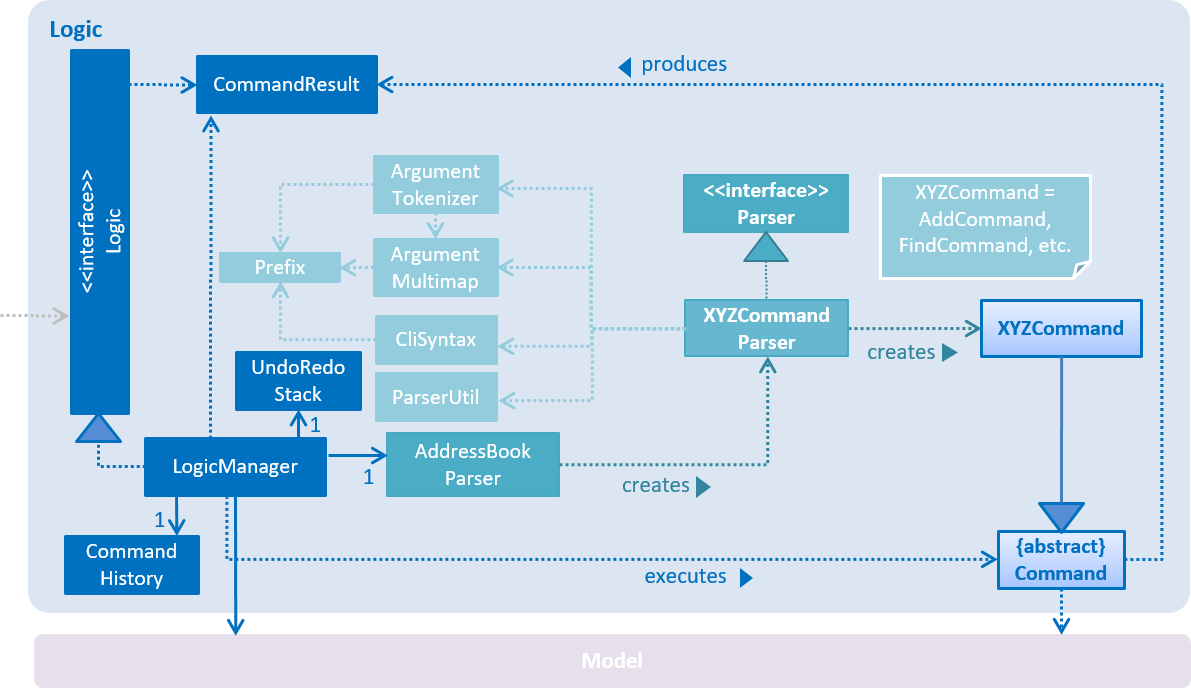
Structure of the logic component is shown in the above diagram.
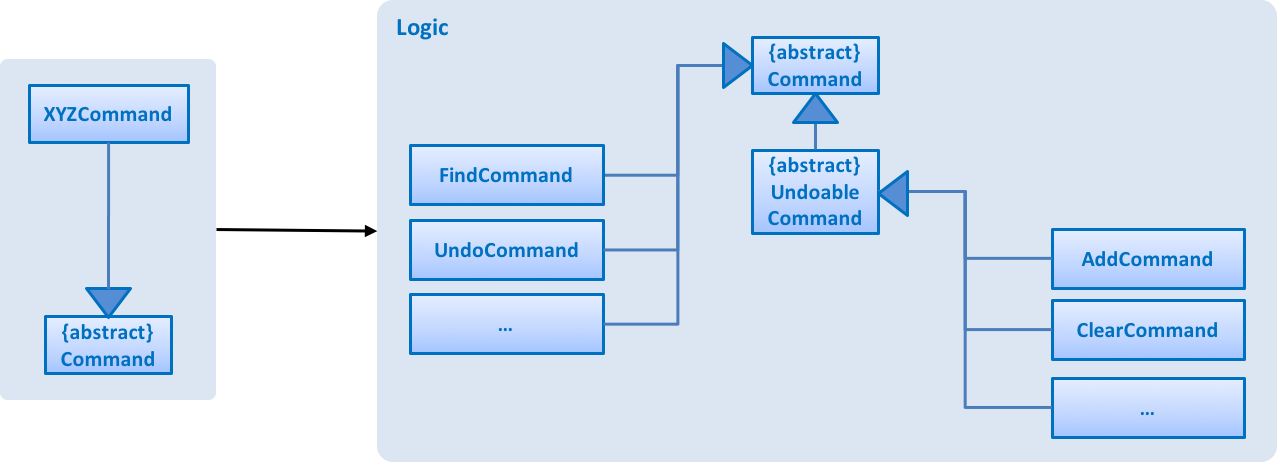
The above diagram represents the structure of Commands in the logic component. It shows finer details concerning XYZCommand and Command in the previous diagram.
API :
Logic.java
-
Logicuses theRolodexParserclass to parse the user command. -
This results in a
Commandobject which is executed by theLogicManager. -
The command execution can affect the
Model(e.g. adding a person) and/or raise events. -
The result of the command execution is encapsulated as a
CommandResultobject which is passed back to theUi.
Given below is the Sequence Diagram for interactions within the Logic component for the execute("delete 1") API call.
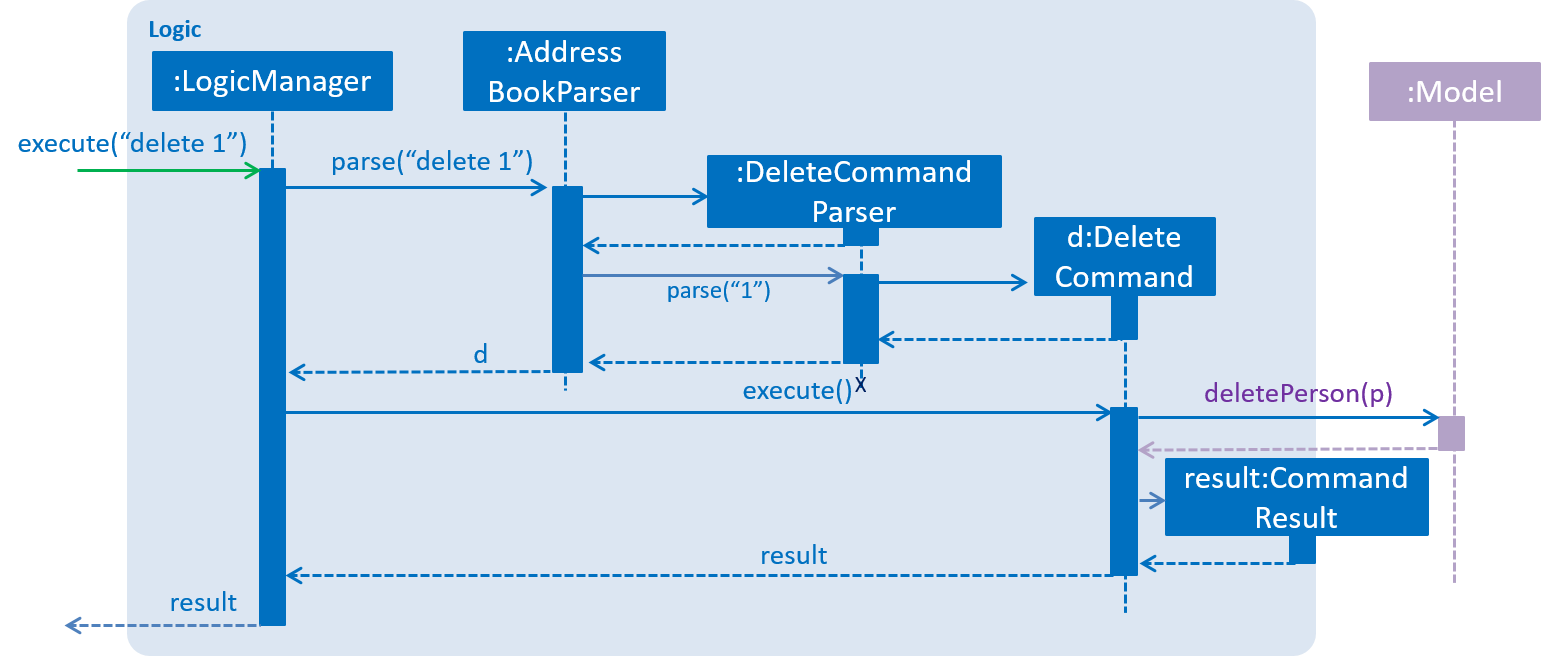
The above diagram show the interactions inside the logic component for the delete 1 command.
3.4. Model Component
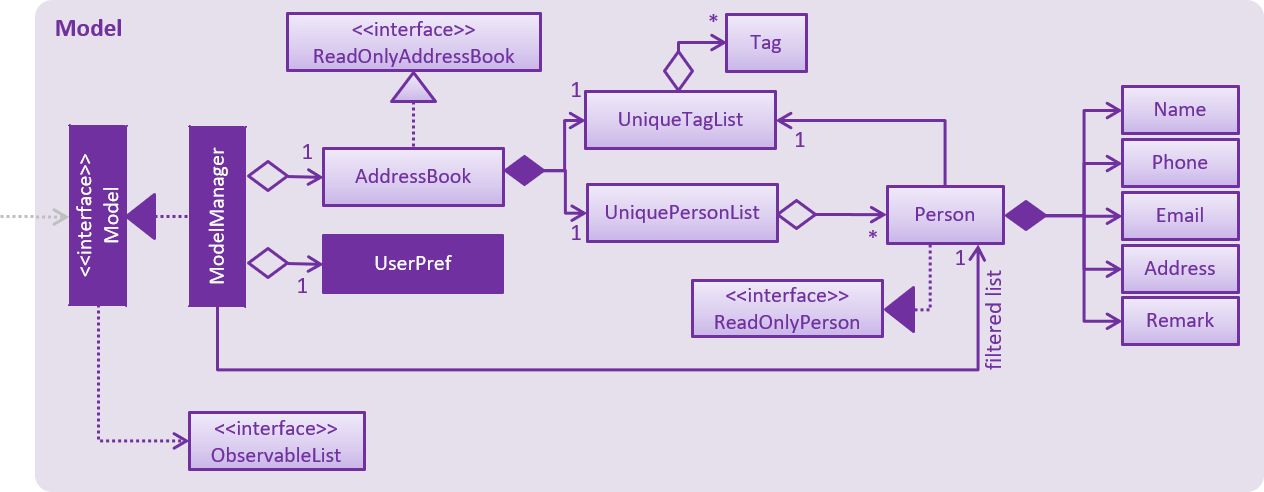
Structure of the model component is shown in the above diagram.
API : Model.java
The Model,
-
stores a
UserPrefobject that represents the user’s preferences. -
stores the Rolodex data.
-
exposes an unmodifiable
ObservableList<ReadOnlyPerson>that can be 'observed' e.g. the UI can be bound to this list so that the UI automatically updates when the data in the list change. -
does not depend on any of the other three components.
3.5. Storage Component
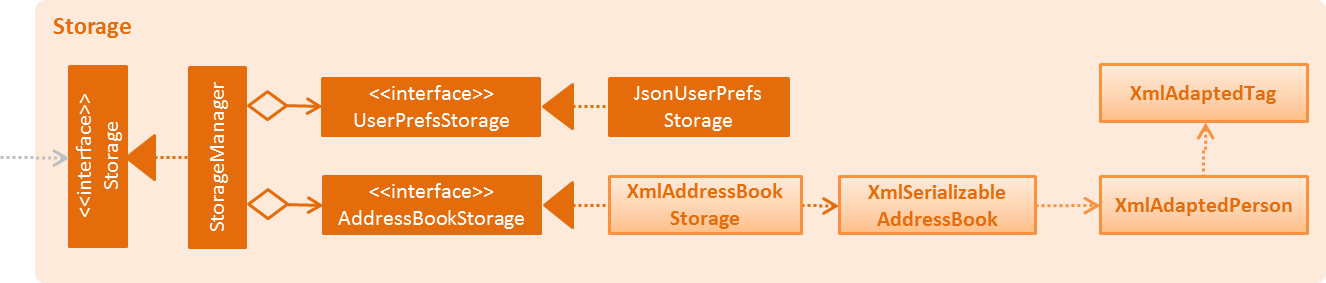
Structure of the storage component is shown in the above diagram.
API : Storage.java
The Storage component,
-
can save
UserPrefobjects in json format and read it back. -
can save the Rolodex data in xml format and read it back.
3.6. Common Classes
Classes used by multiple components are in the seedu.addressbook.commons package.
4. Implementation
This section describes some noteworthy details on how certain features are implemented.
4.1. Undo/Redo Mechanism
The undo/redo mechanism is facilitated by an UndoRedoStack, which resides inside LogicManager. It supports undoing and redoing of commands that modifies the state of the rolodex (e.g. add, edit). Such commands will inherit from UndoableCommand.
UndoRedoStack only deals with UndoableCommands. Commands that cannot be undone will inherit from Command instead. The following diagram shows the inheritance diagram for commands:
As you can see from the diagram, UndoableCommand adds an extra layer between the abstract Command class and concrete commands that can be undone, such as the DeleteCommand. Note that extra tasks need to be done when executing a command in an undoable way, such as saving the state of the rolodex before execution. UndoableCommand contains the high-level algorithm for those extra tasks while the child classes implements the details of how to execute the specific command. Note that this technique of putting the high-level algorithm in the parent class and lower-level steps of the algorithm in child classes is also known as the template pattern.
Commands that are not undoable are implemented this way:
public class ListCommand extends Command {
    @Override
    public CommandResult execute() {
        // ... list logic ...
    }
}
With the extra layer, the commands that are undoable are implemented this way:
public abstract class UndoableCommand extends Command {
@Override
public CommandResult execute() {
// ... undo logic ...
executeUndoableCommand();
}
}
public class DeleteCommand extends UndoableCommand {
@Override
public CommandResult executeUndoableCommand() {
// ... delete logic ...
}
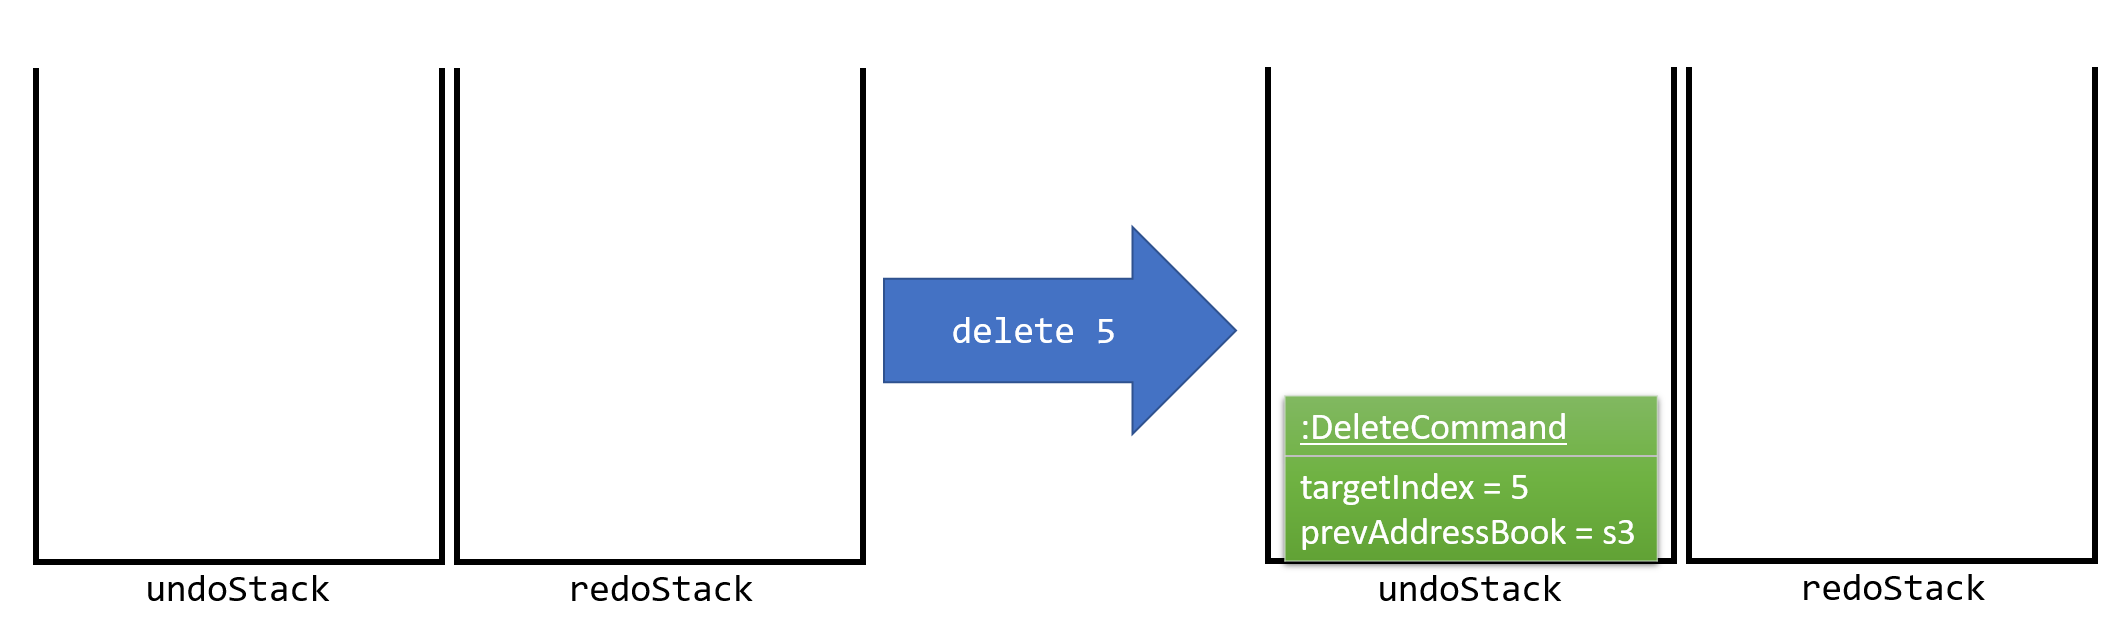
}Suppose that the user has just launched the application. The UndoRedoStack will be empty at the beginning.
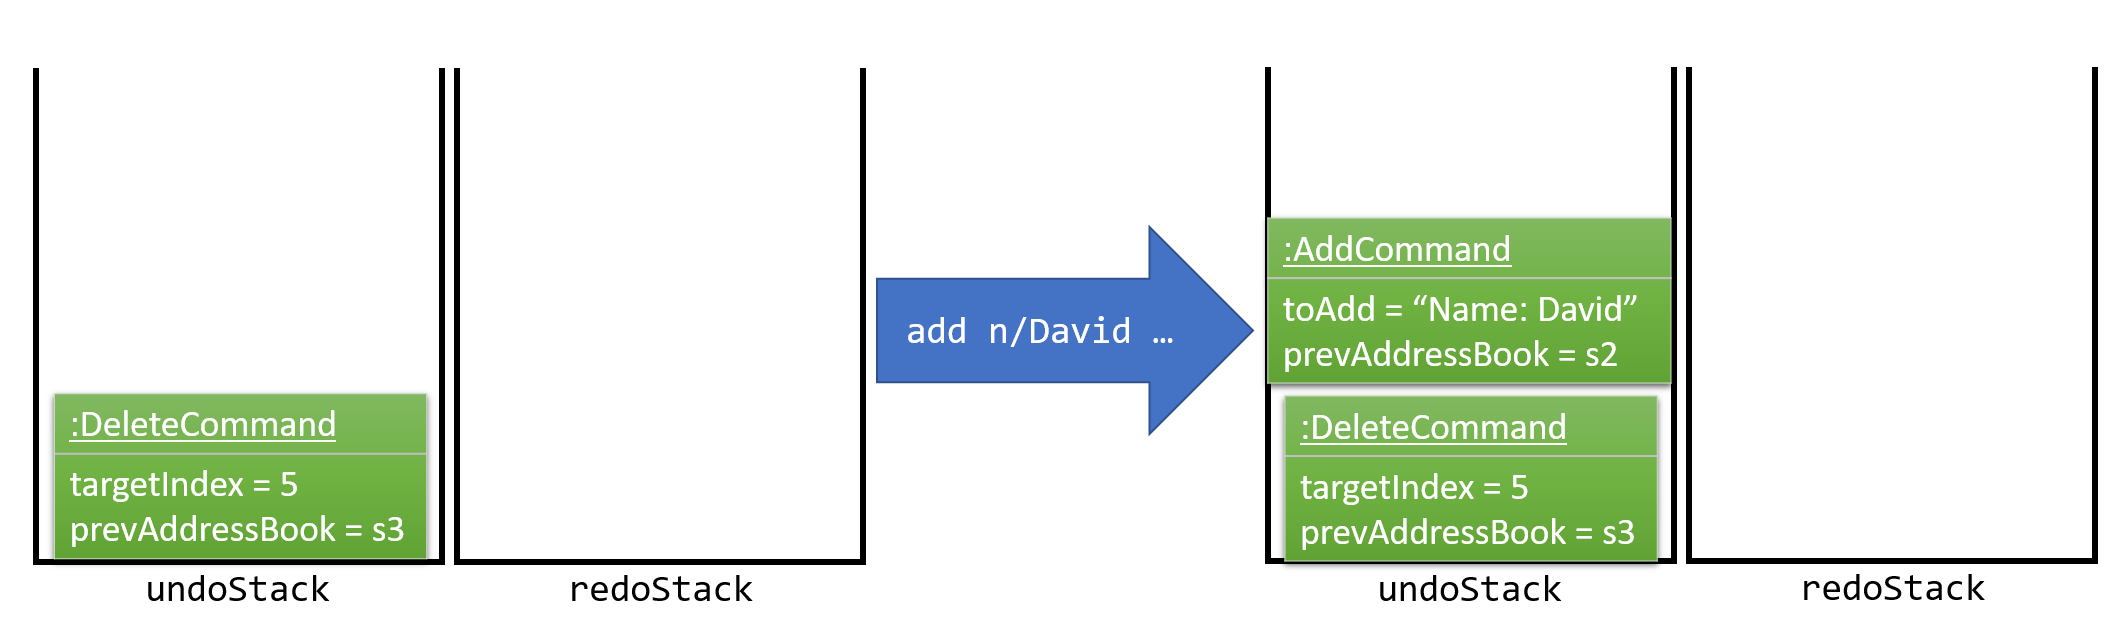
The user executes a new UndoableCommand, delete 5, to delete the 5th person in the rolodex. The current state of the rolodex is saved before the delete 5 command executes. The delete 5 command will then be pushed onto the undoStack (the current state is saved together with the command).
As the user continues to use the program, more commands are added into the undoStack. For example, the user may execute add n/David … to add a new person.
If a command fails its execution, it will not be pushed to the UndoRedoStack at all.
|
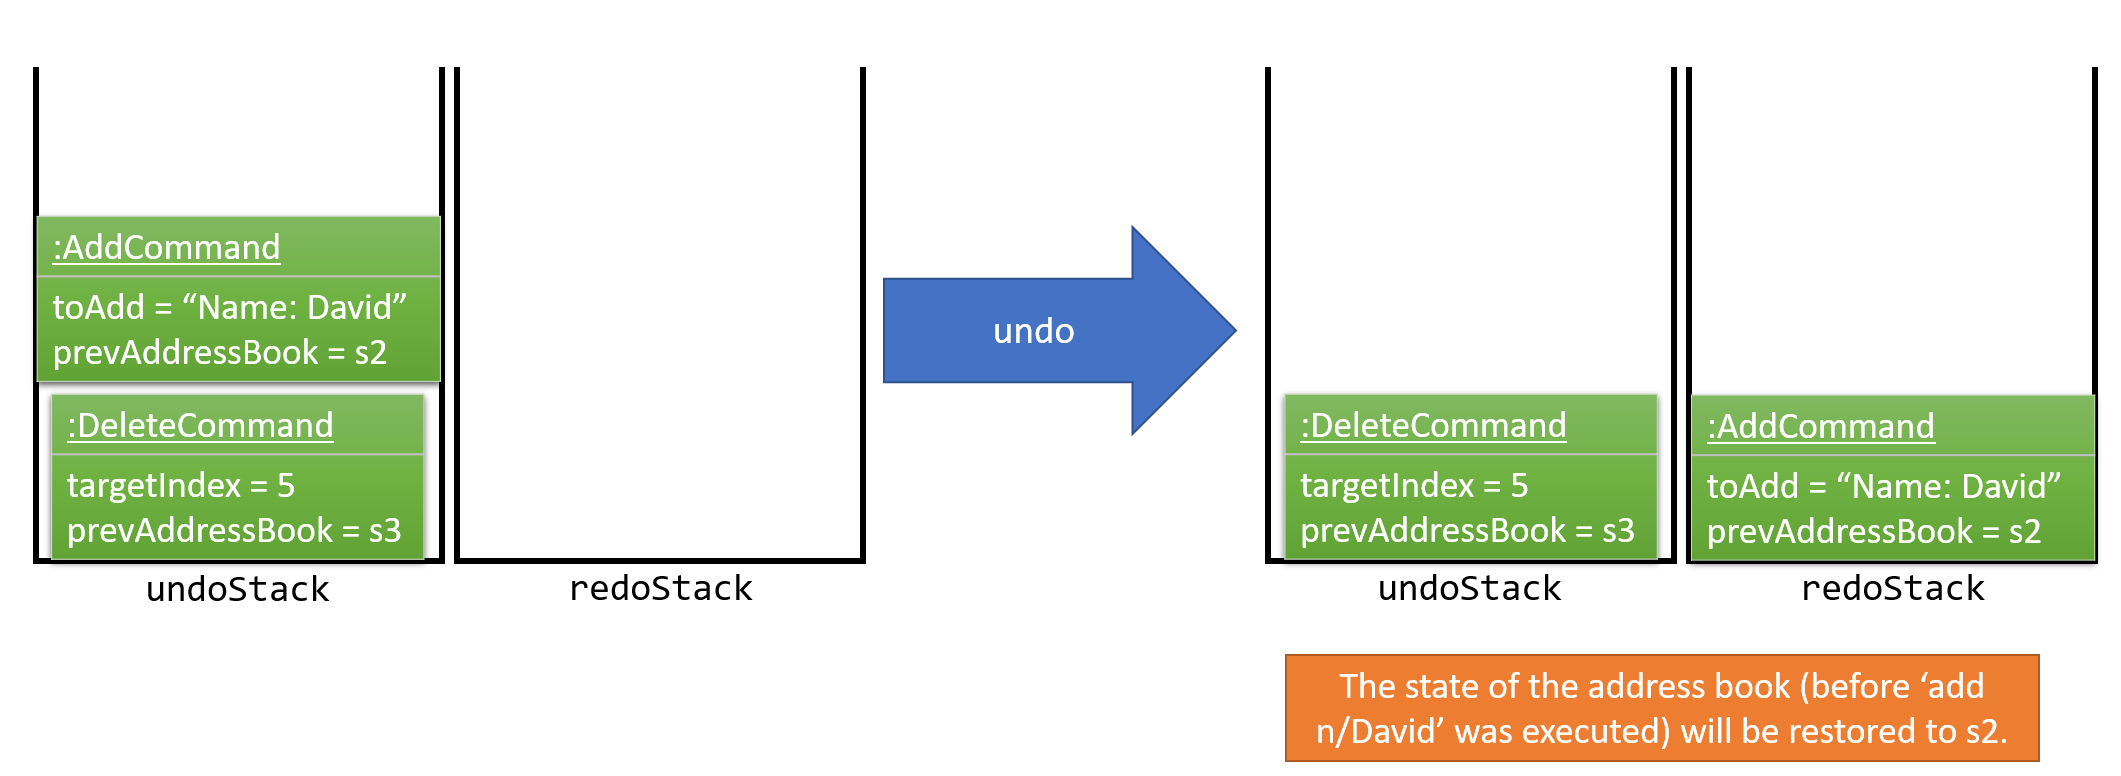
The user now decides that adding the person was a mistake, and decides to undo that action using undo.
We will pop the most recent command out of the undoStack and push it back to the redoStack. We will restore the rolodex to the state before the add command executed.
If the undoStack is empty, then there are no other commands left to be undone, and an Exception will be thrown when popping the undoStack.
|
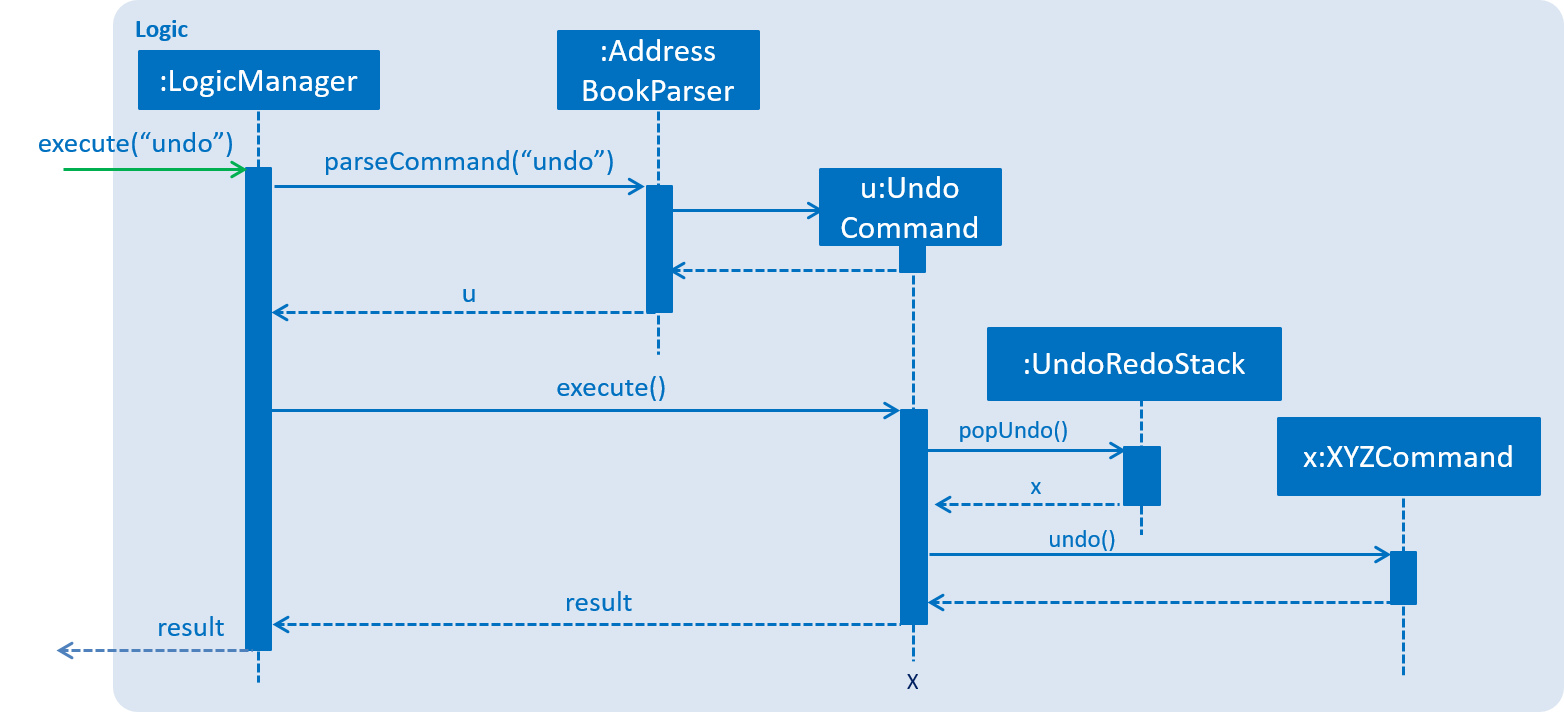
The following sequence diagram shows how the undo operation works:
The redo does the exact opposite (pops from redoStack, push to undoStack, and restores the rolodex to the state after the command is executed).
If the redoStack is empty, then there are no other commands left to be redone, and an Exception will be thrown when popping the redoStack.
|
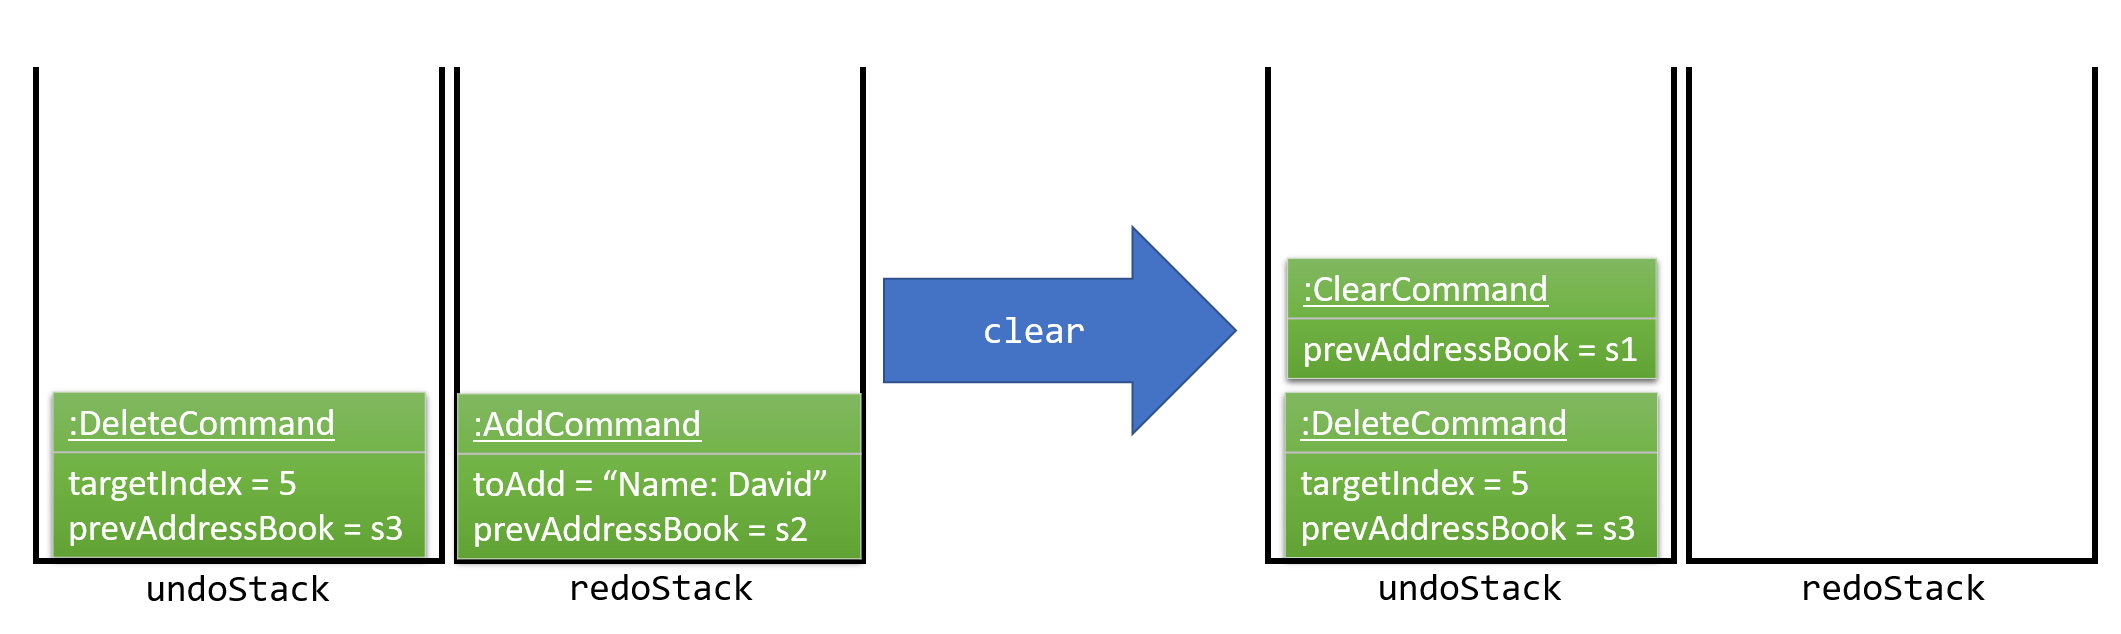
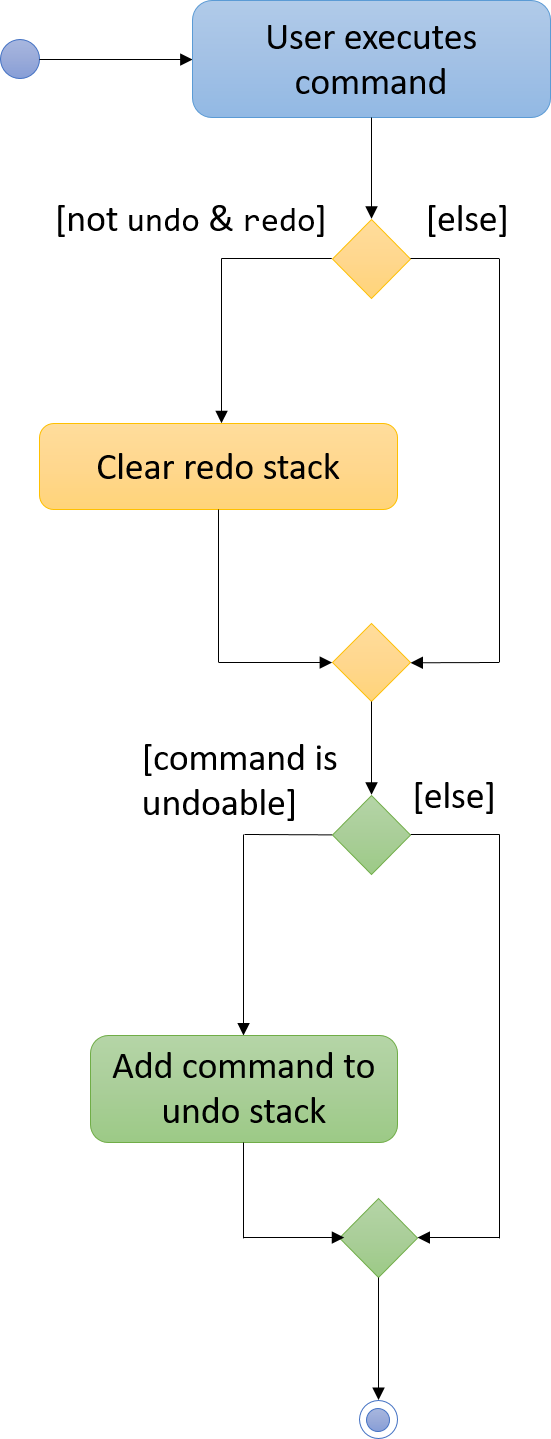
The user now decides to execute a new command, clear. As before, clear will be pushed into the undoStack. This time the redoStack is no longer empty. It will be purged as it no longer make sense to redo the add n/David command (this is the behavior that most modern desktop applications follow).
Commands that are not undoable are not added into the undoStack. For example, list, which inherits from Command rather than UndoableCommand, will not be added after execution:

The following activity diagram summarize what happens inside the UndoRedoStack when a user executes a new command:
4.1.1. Design Considerations
Implementation of UndoableCommand
Alternative 1 (current choice): Add a new abstract method executeUndoableCommand()
Pros: We will not lose any undone/redone functionality as it is now part of the default behaviour. Classes that deal with Command do not have to know that executeUndoableCommand() exist.
Cons: Hard for new developers to understand the template pattern.
Alternative 2: Just override execute()
Pros: Does not involve the template pattern, easier for new developers to understand.
Cons: Classes that inherit from UndoableCommand must remember to call super.execute(), or lose the ability to undo/redo.
How undo & redo executes
Alternative 1 (current choice): Saves the entire rolodex.
Pros: Easy to implement.
Cons: May have performance issues in terms of memory usage.
Alternative 2: Individual command knows how to undo/redo by itself.
Pros: Will use less memory (e.g. for delete, just save the person being deleted).
Cons: We must ensure that the implementation of each individual command are correct.
Type of commands that can be undone/redone
Alternative 1 (current choice): Only include commands that modifies the rolodex (add, clear, edit).
Pros: We only revert changes that are hard to change back (the view can easily be re-modified as no data are lost).
Cons: User might think that undo also applies when the list is modified (undoing filtering for example), only to realize that it does not do that, after executing undo.
Alternative 2: Include all commands.
Pros: Might be more intuitive for the user.
Cons: User have no way of skipping such commands if he or she just want to reset the state of the rolodex and not the view.
Additional Info: See our discussion here.
Data structure to support the undo/redo commands
Alternative 1 (current choice): Use separate stack for undo and redo
Pros: Easy to understand for new Computer Science student undergraduates to understand, who are likely to be the new incoming developers of our project.
Cons: Logic is duplicated twice. For example, when a new command is executed, we must remember to update both HistoryManager and UndoRedoStack.
Alternative 2: Use HistoryManager for undo/redo
Pros: We do not need to maintain a separate stack, and just reuse what is already in the codebase.
Cons: Requires dealing with commands that have already been undone: We must remember to skip these commands. Violates Single Responsibility Principle and Separation of Concerns as HistoryManager now needs to do two different things.
4.2. Open File and New File Mechanism
The open new file and creating new file mechanism are handled by two new types of requests under the EventsCenter,
OpenRolodexRequestEvent and RolodexChangedDirectoryEvent. Upon receiving a new command, the MainApp attempts to
reload the instance model and logic but not the UI.
The high level sequence diagram for a typical open request can be seen below:
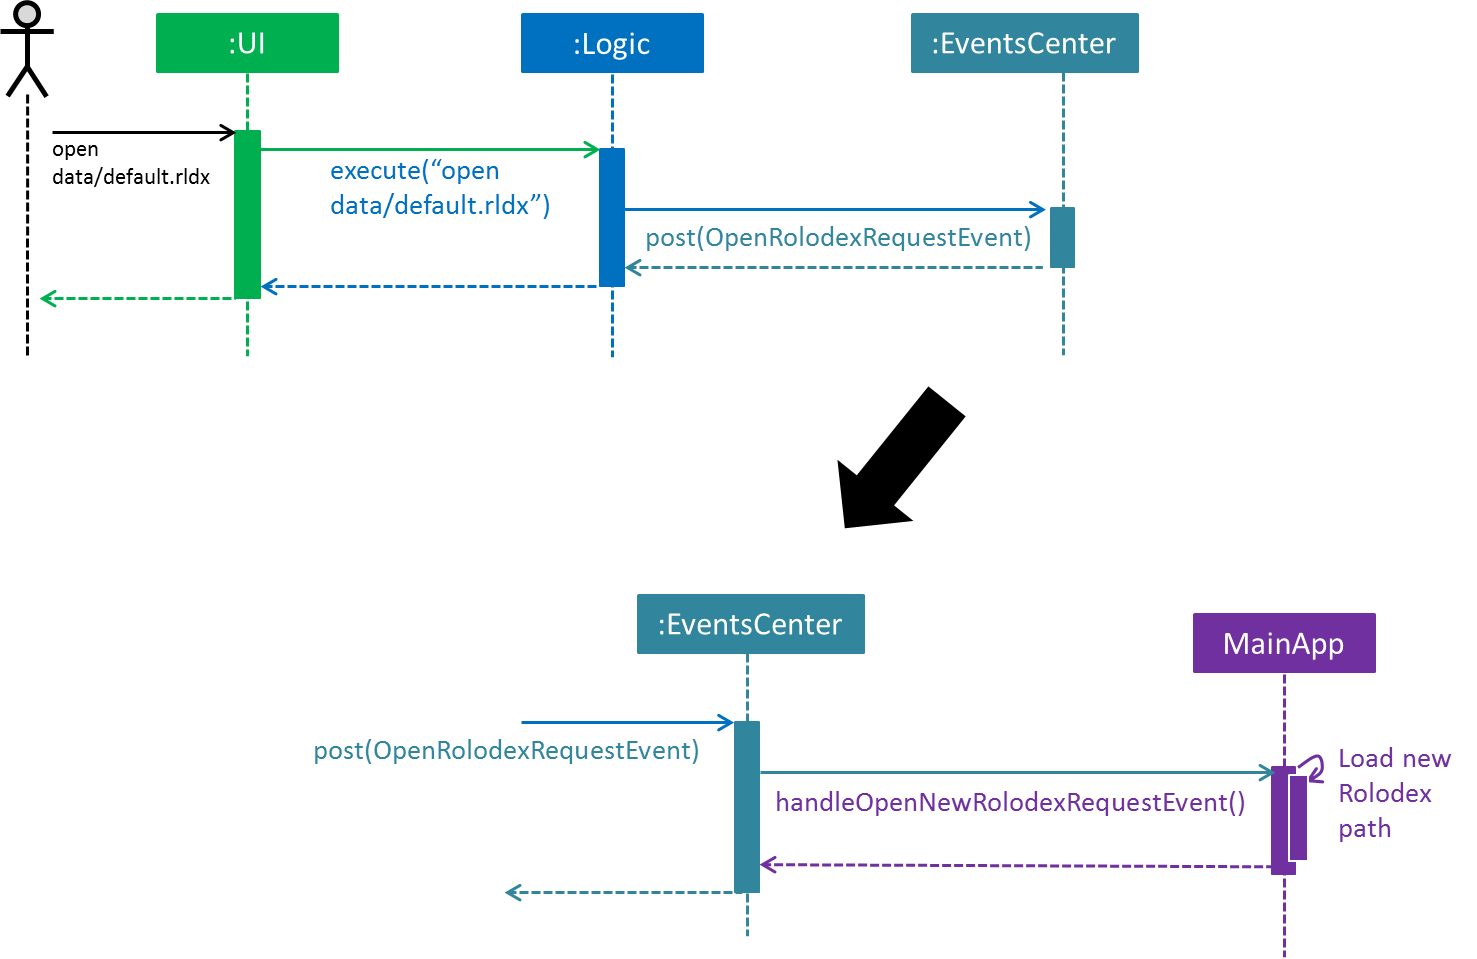
-
A user requests to open
data/default.rldx. -
The command is handled the same way as other commands, by the parser in logic, then via the
OpenRolodexCommandobject itself, under theLogiccomponent of the application. -
Upon a successful parsing of the command and execution, the command would raise a new
OpenRolodexRequestEventto be handled by theEventsCenter. -
The
EventsCenterposts a newOpenRolodexRequestEventback to theMainAppwhere the new Rolodex path would be loaded with the successfully read data from the file path specified:-
The preferences file of the user specified under
config.jsonwould now point to the latest active directory. -
The
storage,modelandlogicinstances of theMainAppwould be now loaded with data from the new active directory.
-
The behaviour of the save operation remains unchanged, to be handled under the RolodexChangedEvent.
The Rolodex only writes to the active database upon an editor command (e.g. add, edit).
The UI however, is updated as seen in the following sequence diagram:
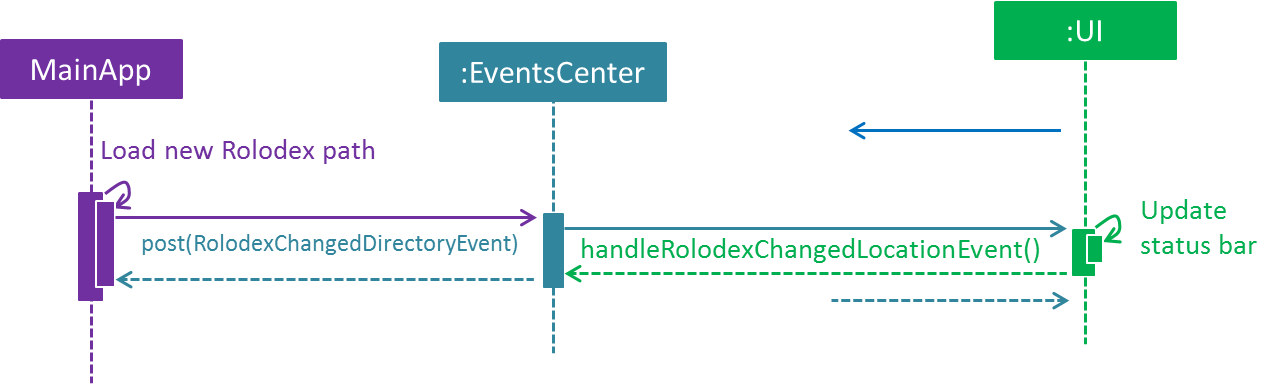
-
Upon successful handling of a
OpenRolodexRequestEvent,MainAppraises a newRolodexChangedDirectoryEvent. -
The event is then reposted by the
EventsCenter. -
The
MainWindowof theUIinstance consumes the event and updates the status bar with the new active filepath.
The New command only differs from the sequence of the open new Rolodex by being executed when no valid file exists at
the specified active directory:
@Override
public CommandResult execute() throws CommandException {
    if (new File(filePath).exists()) {
        throw  new CommandException(String.format(MESSAGE_ALREADY_EXISTS, filePath));
    } else {
        EventsCenter.getInstance().post(new OpenRolodexRequestEvent(filePath));
        return new CommandResult(String.format(MESSAGE_CREATING, filePath));
    }
}
In contrast, the Open command is a reverse of the above:
@Override
public CommandResult execute() throws CommandException {
    if (new File(filePath).exists()) {
        EventsCenter.getInstance().post(new OpenRolodexRequestEvent(filePath));
        return new CommandResult(String.format(MESSAGE_OPENING, filePath));
    } else {
        throw new CommandException(String.format(MESSAGE_NOT_EXIST, filePath));
    }
}
The XmlRolodexStorage.java now only saves upon recognizing that the current file has a .rldx extension, which is a
subset of xml for the Rolodex application, as seen in the snippet below:
|
public void saveRolodex(ReadOnlyRolodex rolodex, String filePath) throws IOException {
    ...
    if (!isValidRolodexStorageExtension(filePath)) {
        throw new InvalidExtensionException(
                String.format(MESSAGE_INVALID_EXTENSION_FORMAT, ROLODEX_FILE_EXTENSION));
    }
    ...
}
4.2.1. Design Considerations
General Implementation
Alternative 1 (current choice): Reload the current MainApp with the new database.
Pros: The application can be quickly reloaded onto the active window.
Cons: User might need to switch back and forth between the Rolodex directories.
Alternative 2: Reload MainApp with a new application instance.
Constraint: JavaFX only allows launch(args) to be launched once per execution time on a code level.
Another approach would be to reload the application with a loaded and built .jar.
Pros: Easier logic to understand for new developers.
Cons: Building and debugging with a second .jar will be confusing and problematic to any development workflow.
Alternative 3: Open a new window with the loaded data.
Pros: The user can continue to operate on the previous Rolodex application.
Cons: The developer would have to spend time configuring different EventsCenter posts for the different application windows.
Saving only to files with .rldx extensions
Alternative 1 (current choice): Write to the active directory only if it has a .rldx extension.
Pros: The application control becomes stricter, preventing users from writing to a file with say a .png extension.
Cons: Extensions become forced even for valid databases with .xml file types.
Alternative 2: Allow writable to all file extensions.
Pros: Users can have more freedom in choice of file naming.
Cons: If the user accidentally writes to a file that is not a valid database, the user would corrupt the file data.
Separating open and new commands
Alternative 1 (current choice): Two commands, one for opening existing files and one for creating new files.
Pros: The user can easily be notified if a file exists or if it has been moved.
Cons: The user would have to take note of two commands instead of one.
4.3. Fuzzy Finding Mechanism
The fuzzy finding mechanism is powered by Levenshtein distance, a string heuristic for measuring the difference between two character sequences. It can be informally viewed as the number of hops that are required to get from a string to another, where hops are insertions, deletions and substitution operations.
The activity diagram for the fuzzy finding can be loosely described as seen in the figure below:
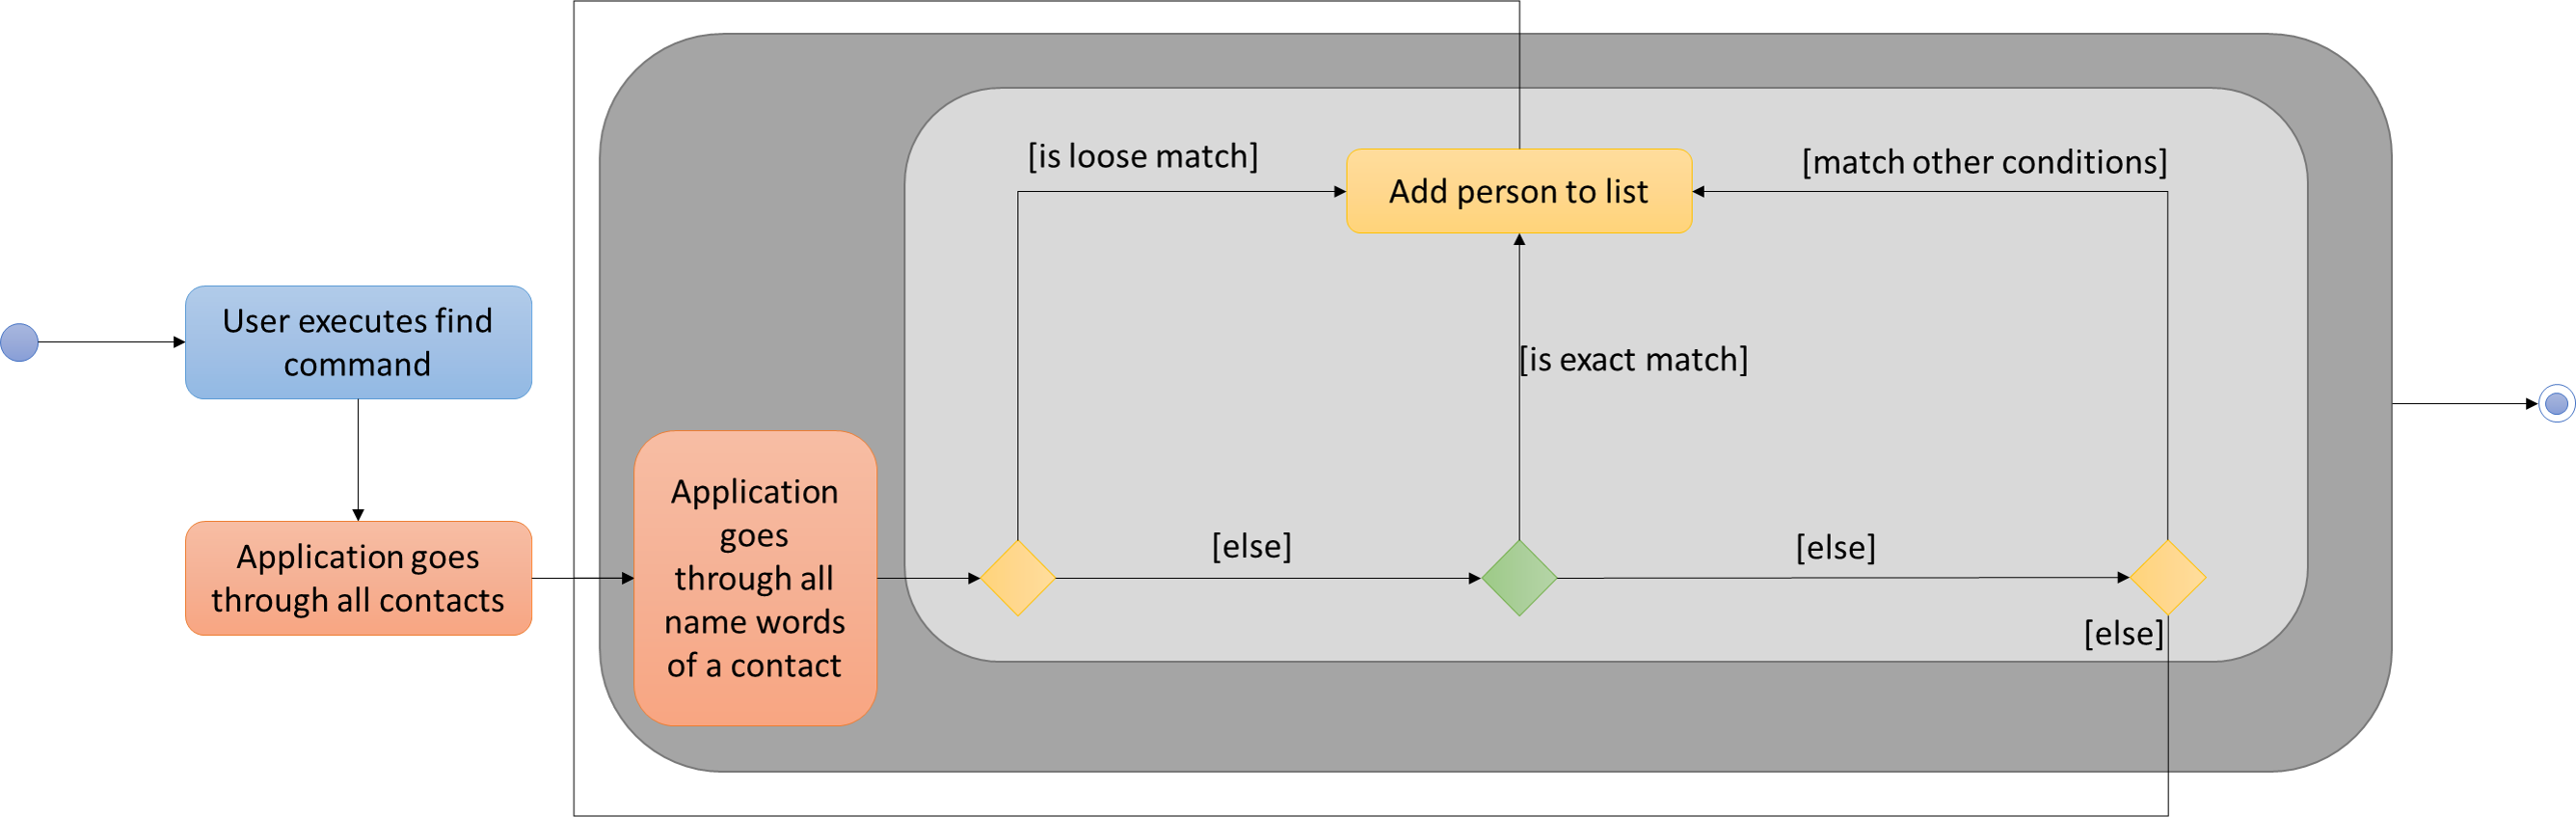
-
A user sends a find request
-
Application looks at all contacts currently in the database
-
If the search parameters loosely match any of the name words of the current contact, add it into the list view.
-
Otherwise, if it is an exact match on any of the name words of the current contact, add it into the list view.
-
Otherwise, if it matches any other conditions specified under the find command, add it into the list view.
| If a contact’s name word has a shorter length than the specified global minimum, the condition automatically triggers to false and starts searching for exact matches. |
The settings for the loose matching can be found as a static constant of the Person class.
public class Person implements ReadOnlyPerson {
    private static final int FIND_NAME_GLOBAL_TOLERANCE = 4;
    private static final int FIND_NAME_DISTANCE_TOLERANCE = 2;
    ...
}
FIND_NAME_GLOBAL_TOLERANCE is the global minimum distance of the currently examined name word for the loose matching to execute.
FIND_NAME_DISTANCE_TOLERANCE is the maximum levenshtein distance from the currently examined search parameter
to the currently examined name word in which the contact will be added.
4.3.1. Design Considerations
Length of name word
Alternative 1 (current choice): Use a global minimum for defining when the fuzzy finding should execute.
Pros: Name words have higher minimum hop to length ratio.
Cons: User might need fuzzy finding on name words with character length lesser than the global minimum.
Pros: Easy logic to understand, implement and maintain.
Cons: Rudimentary algorithm.
Location of fuzzy find settings
Alternative 1 (current choice): Use private static constant in a person.
Pros: User does not need to worry about changing the settings or the intricacies of the fuzzy finding.
Cons: User might need stricter or looser limits than the ones defined for them.
Pros: Developers can easily change and manage settings and limits.
Cons: Users have no way of accessing the settings and limits.
Alternative 2: Allow user to set fuzzy find settings in a document file.
Pros: Advanced users can change the settings to suit their needs better.
Cons: Developers need to spend more work maintaining more components including storage.
4.4. Sorting Mechanism
The sorting mechanism is integrated into the list and find commands which resides in the application’s logic component.
It supports sorting in ascending or descending order of most fields of a person (e.g. Name, Phone).
The sort commands update the state of the application at the model level, which resides in ModelManager,
via the method updateSortComparator.
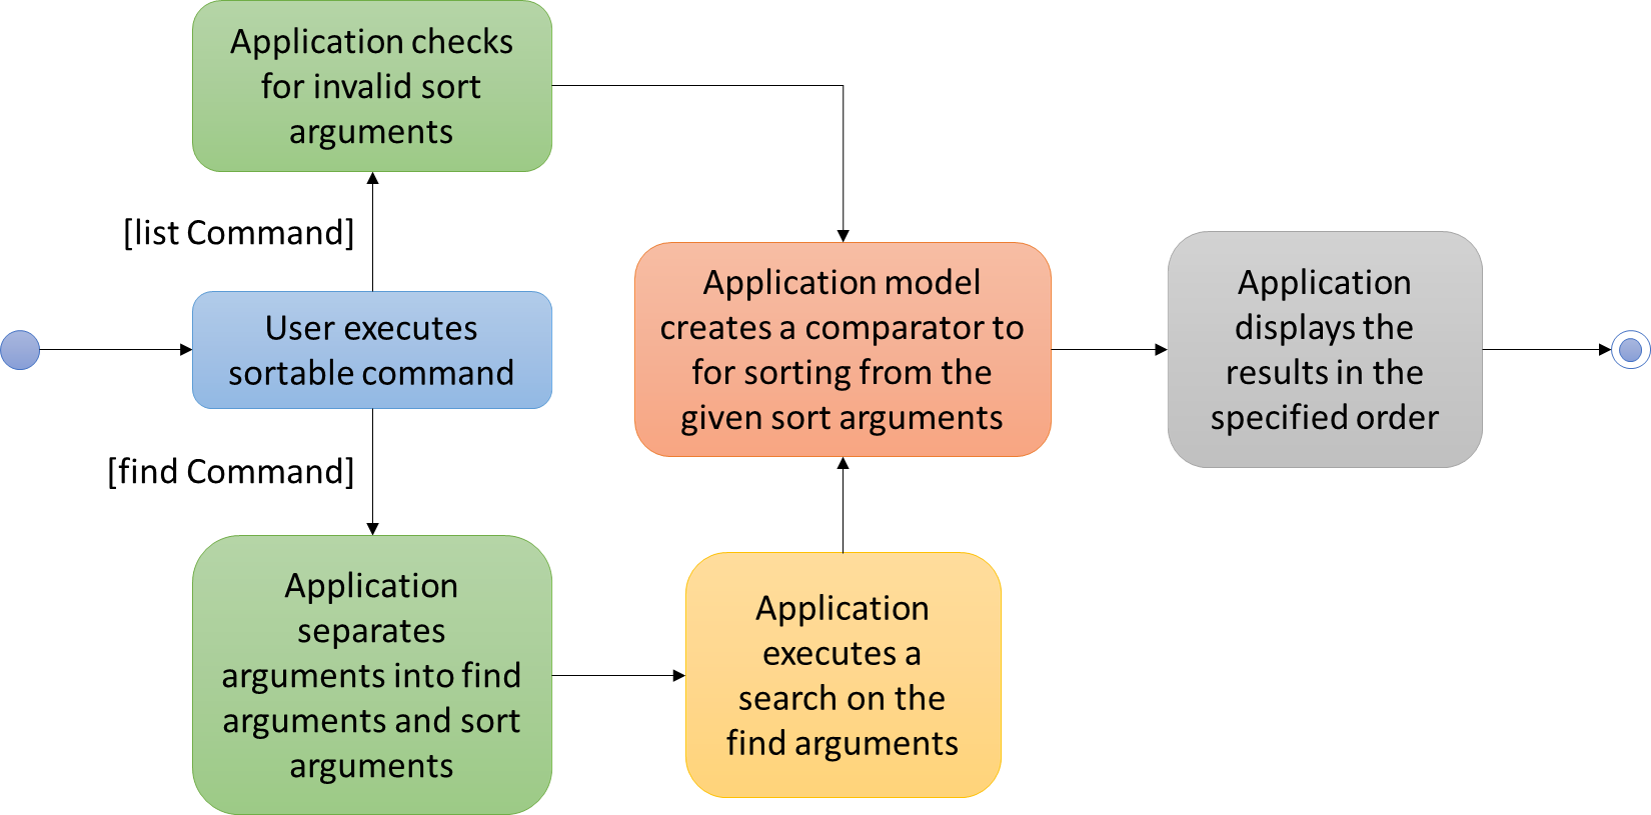
The activity diagram for a sort can be loosely described as seen in the figure below:
| Sort arguments are case-sensitive. |
The case for a list command:
-
A user executes a
listcommand with sort arguments. -
The application checks for invalid sort arguments.
-
The application model creates a comparator using the sort arguments, in order.
-
The application displays the results in the specified sort order.
The case for a find command:
-
A user executes a
findcommand. -
The application separates the command arguments into find data arguments and sort arguments.
-
The application executes a search on the find arguments.
-
The application model creates a comparator using the sort arguments, in order.
-
The application displays the filtered results in the specified sort order.
| Find cannot work on name words matching sort arguments. |
The list command’s execute() implementation before sorting implementation:
@Override
public CommandResult execute() {
    model.updateFilteredPersonList(PREDICATE_SHOW_ALL_PERSONS);
    return new CommandResult(MESSAGE_SUCCESS);
}
The list command’s execute() implementation after sorting implementation:
@Override
public CommandResult execute() {
    model.updateSortComparator(sortArguments);
    model.updateFilteredPersonList(PREDICATE_SHOW_ALL_PERSONS);
    return new CommandResult(MESSAGE_SUCCESS);
}
Notice that model.updateSortComparator(sortArguments) is added to the command logic. The update will give the model a
comparator before executing a sort and filter which is handled by the event consumer.
4.4.1. Design Considerations
Integrating sort
Alternative 1 (current choice): Integrate sort into existing commands.
Pros: User can quickly sort and list or find the data as specified without executing another separate command.
Cons: User might need to use the sort arguments for other purposes (e.g. find n/ does not return anyone matching n/).
Pros: Adds onto existing functionality and reduces clutter and unnecessary creation of a new command.
Cons: Bad SLAP on a user level.
Alternative 2: Create a new sort command.
Pros: User can decide when to sort the current list view
Cons: User needs an additional step before sorting a list.
Resetting sort comparator on add commands
Alternative 1 (current choice): Reset the current displayed list on an add command.
Pros: The displayed list always complies with the model comparator.
Cons: User might need to continue operating on the previous listing.
Alternative 2: Append added person to the current list view.
Pros: Users can immediately edit the person using the last listing index.
Cons: The displayed listing will not comply with the model comparator.
4.5. Abbreviation Mechanism
The ability for users to enter a variety of different words for a same command is implemented using java.util.set.
An example as implemented in the open command:
import java.util.HashSet;
import java.util.Set;

public class OpenRolodexCommand extends Command {

    public static final String COMMAND_WORD = "open";
    public static final Set<String> COMMAND_WORD_ABBREVIATIONS =
            new HashSet<>(Arrays.asList(COMMAND_WORD, "o", "cd", "ls", "<"));
    ...
}
COMMAND_WORD_ABBREVIATIONS is implemented using a java.util.HashSet which offers reasonably fast access times.
The user would be able to use a wide variety of different commands such as o, cd like on Windows cmd, ls on
UNIX-like systems or the loose < such as when you run a java program < input > output on a wide variety of systems.
It can easily be seen that using a set implementation, the developer would have an extremely easy time adding/ deleting
new abbreviations. A set implementation also allows an easy way of testing if there are conflicting abbreviations, by
simply permuting the COMMAND_WORD_ABBREVIATIONS property of all possible commands and checking if all permutations are
pairwise disjoint:
@Test
public void parseAllCommandAbbreviationsAreDisjoint() {
    ArrayList<Pair<Set<String>, Set<String>>> commandAbbreviationPermutations =
            generateCommandAbbreviationPermutations(POSSIBLE_COMMAND_ABBREVIATIONS);
    for (Pair<Set<String>, Set<String>> commandAbbreviationPair : commandAbbreviationPermutations) {
        assertTrue(Collections.disjoint(commandAbbreviationPair.getKey(), commandAbbreviationPair.getValue()));
    }
}
4.5.1. Design Considerations
Implementation
Alternative 1 (current choice): A Set of strings
Pros: Constant access time per command level. Improves performance and reliability significantly.
Pros: Ease of testing for conflicting abbreviations, particularly where developers forget if they used a
same abbreviation for two different commands (e.g. assigning h to both the history and help commands).
Cons: If you have a better suggestion than the above implementation, feel free to create a new issue for discussion
on github.
Alternative 2 (previous choice): Manually named string Constants
Pros: Forces developer to be more prudent in checking through the conflicting abbreviations.
Cons: Developers would have to manually check through all commands to ensure the accuracy of the abbreviations,
which is time-consuming and makes way for human errors.
Cons: A switch-case for all possible commands abbreviations would perform significantly slower than direct memory
access on a java HashSet, in the worst case.
4.6. Drop-down List of Possible Commands
The dynamic drop-down list is created using org.controlsfx.control.textfield.TextFields API (Application Programming Interface).
The bindAutoCompletion method in the TestFields creates a new auto-completion binding between the given textField and the given suggestion provider.
The code below shows the exact implementation.
TextFields.bindAutoCompletion(commandTextField, sr -> {
    Set<String> suggestedCommands = new HashSet<>();
    for (String command: LIST_OF_ALL_COMMANDS) {
        if (!sr.getUserText().isEmpty() && !command.equals(sr.getUserText())
            && command.startsWith(sr.getUserText().trim().toLowerCase())) {

            suggestedCommands.add(command);
        }
    }
    return suggestedCommands;
});
Possible commands are checked against the user input and added to the Set suggestedCommands accordingly, which will be displayed as the drop-down list.
A command is added if all three conditions are satisfied:
-
The user input is not empty.
-
This is to prevent the drop-down list from appearing every time the command box is cleared after the execution of a command.
-
-
The user input is not a valid command.
-
There is no need to display the drop-down list of suggestions when the user has typed in a correct command.
-
-
The command starts with the user input.
-
This is to suggest the possible commands that the user is trying to type.
-
4.6.1. Design Considerations
Implementation
Alternative 1 (current choice): Make use of TestFields API
Pros: Easy to implement
Pros: List is dynamic.
Cons: User cannot see the full format of the commands in the drop-down list.
Alternative 2: Use ComboBox
Pros: User can see the required fields for each command in the drop-down box.
Cons: As user selects an option, the command is executed with the place holders, resulting in an invalid command. User has to manually select the placeholders and change accordingly.
Auto-completion binding
Alternative 1 (current choice): Only suggest commands that starts with user input
Pros: Suggested commands are accurate.
Cons: The list usually only display one or two options because not many commands start with the same alphabet.
Alternative 2: Suggest commands that contain the user input.
Pros: More suggestions would be displayed.
Pros: User has a higher chance of finding the desired command when a typo is made.
Cons: Most of the time, inaccurate suggestions are not necessary.
4.7. Auto-completion Mechanism
Auto-completion mechanism is implemented in CommandBox class under UI component.
Auto-completion is activated when Tab key is pressed. This is done by adding a case in the keypress handler in CommandBox.
@FXML
private void handleKeyPress(KeyEvent keyEvent) {
switch (keyEvent.getCode()) {
case TAB:
if (keyEvent.isShiftDown()) {
selectPreviousField();
} else {
autocomplete();
}
break;
//other cases
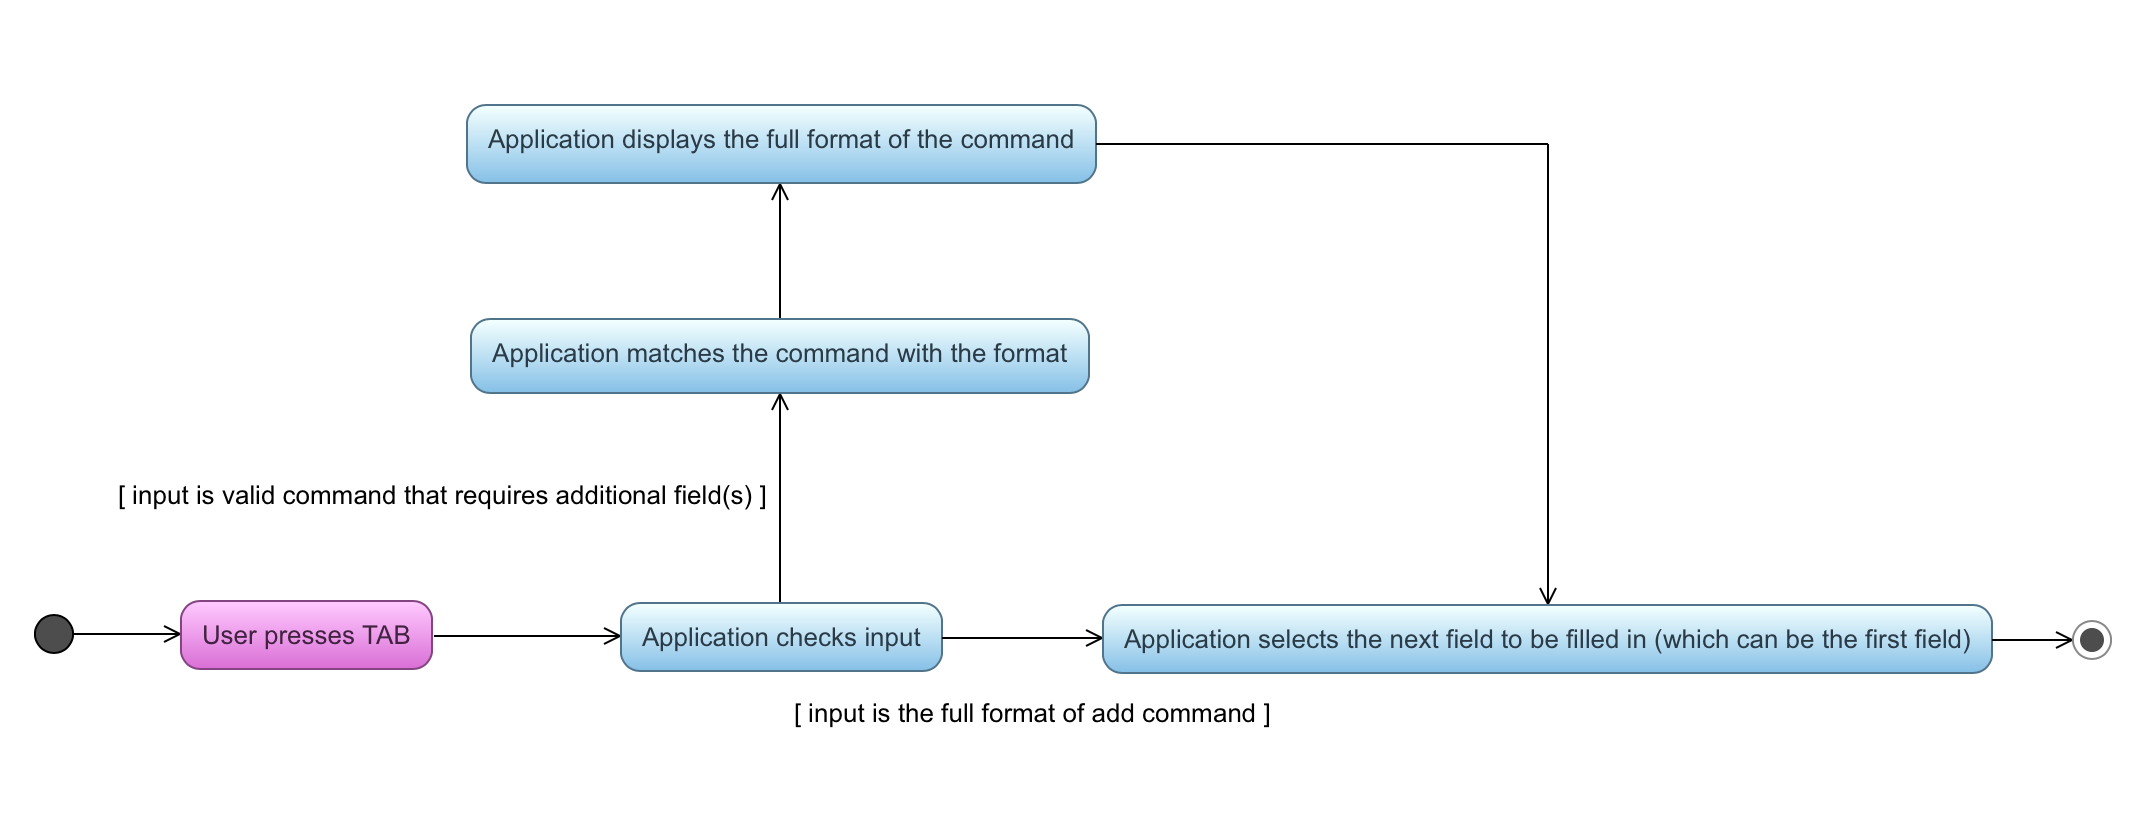
}When Tab is pressed, the current input in the command box is checked against the list of commands.
-
If the input command is a valid command that requires additional field(s), the full format of the command is displayed in the command box. At the same time, the placeholder for the first field that the user needs to key in is selected (as shown below).

-
If the input is already in the required format of
addorremarkcommand, the Tab is meant to navigate to the next input field (onlyaddandremarkrequire more than one field). The caret position is used to determine the current field the user is at. The anchor and caret positions are reset to the start and end of the next field so that the placeholder is selected (as shown below).

The above implementation is represented in this code snippet:
private void autocomplete() {
    input = commandTextField.getText().trim().toLowerCase();
    if (isAutoCompleteCommand(input)) {
        //display the full command format

    } else if (isAddCommandFormat(input)) {
        //change text selection to the next field

    } else if (isRemarkCommandFormat(input)) {
        //change text selection to the next field
    }
}
When Shift+Tab is pressed, the user wants to navigate to the previous field. The caret position is used to determine the current field the user is at. The anchor and caret positions are reset to the start and end of the previous field input in order to update text selection.
Below is an activity diagram for Tab keypress which activates auto-completion.
4.7.1. Design Considerations
Text Input Control
Alternative 1 (current choice): Continue to use the original TextField
Pros: External library enables bindAutocompletion for TextField (the drop down list of suggested commands that appears and updates itself as user types).
Pros: Minimise changes need to be made to the original text input control structure.
Cons: Text formatting is limited. All text in the TextField must have the same format.
Alternative 2: Create additional TextField as user request for additional fields
Pros: Allows for different formatting for different fields (Commands can have a different colour from the fields)
Cons: Original structure will be disrupted. Command box will no longer be single line text input, which have consequences such as the user cannot backspace or select through the entire line.
4.8. Keyboard Shortcuts Mechanism
The keyboard shortcuts mechanism is implemented in the KeyListener class under the UI component of the application.
It listens for key presses done by the user and executes actions mapped to these key presses, or key events.
The mapping of actions to key events are found in the KeyListenerUtil class.
The following class diagram shows the relationship between classes concerning the keyboard shortcuts mechanism.
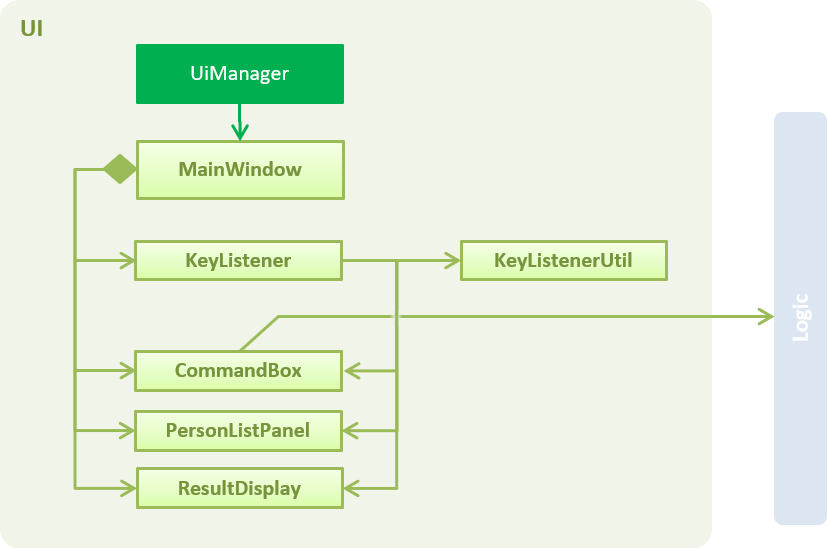
The KeyListener requires access to the CommandBox, PersonListPanel and ResultDisplay for key event executions,
such as changing the focus node.
When the user launches the application, the UiManager calls mainWindow.setKeyListeners()
which creates the KeyListener class to handle the key events.
In KeyListener, the main method for handling the key events has the following code:
public void handleKeyPress() {
    mainNode.addEventFilter(KeyEvent.KEY_PRESSED, event -> {
        // actions to execute key event
    });
}
The mainNode refers to the node containing the all UI components in the application,
and addEventFilter captures key events received by that node. The application will continue to listen
to key presses done by the user once this method is called.
Another common method used for capturing key events is onKeyPressed.
In this case, addEventFilter is used instead as key events captured by the former will be consumed by the TextField used in the application.
addEventFilter captures the key events before they are consumed by the TextField.
|
When the user presses a key combination which matches one that is assigned, a corresponding action will be executed. An example of such an execution is given as shown:
private void executeKeyEvents(KeyEvent keyEvent) {
        if (KEY_COMBINATION_FOCUS_PERSON_LIST.match(keyEvent)) {
                // action to focus on person list
        }
        // … more cases
}
Where the application focuses on the person list when the user presses a key combination that is assigned to KEY_COMBINATION_FOCUS_PERSON_LIST.
The mapping of KEY_COMBINATION_FOCUS_PERSON_LIST to a key combination can be found in the KeyListenerUtil class.
public class KeyListenerUtil {

    public static final KeyCombination KEY_COMBINATION_FOCUS_PERSON_LIST = KeyCombination.valueOf("Esc");
    // … more mappings
}
In this case, KEY_COMBINATION_FOCUS_PERSON_LIST is mapped to the esc key. As such, a user
pressing the esc key will result in the application focusing on the person list.
4.8.1. Design Considerations
Location of KeyCombination constants for the KeyListener class
Alternative 1 (current choice): KeyCombination constants are stored in a separate utility class, KeyListenerUtil
Pros: Better modularity given that the number of constants is fairly large.
Cons: The constants have to be imported to be used in the KeyListener class.
Alternative 2: Store the constants in the KeyListener class itself
Pros: Straightforward implementation and the constants does not have to be imported.
Cons: Violates Separation of Concerns as the KeyListener class acts as a storage for the constants in addition to handling key events.
The way commands words are executed
Alternative 1 (current choice): Pressing the shortcut automatically executes the command
Pros: Execution of command is faster and more convenient for the user.
Cons: User may want to check what the shortcut does before executing the command.
Alternative 2: Pressing the shortcut replaces the TextField with the command word
Pros: Allows the user to check the command before executing it.
Cons: An extra step for user to execute the command, i.e. pressing Enter.
4.9. Auto-complete Command Shortcuts
The Keyboard Shortcut Mechanism is the foundation of this implementation.
When an auto-complete command shortcut is pressed, the corresponding command format will be displayed.
The following codes shows the example for add command shortcut.
private void executeKeyEvents(KeyEvent keyEvent) {
    if (KEY_COMBINATION_ADD.match(keyEvent)) {
        displayCommandFormat(AddCommand.FORMAT);
    }
    // … more cases
}
The displayCommandFormat method simulates entering the command word followed by pressing Tab.
The method implementation is shown below.
private void displayCommandFormat(String command) {
    commandBox.replaceText(command);
    commandBox.pressTab();
}
4.10. Person Detail Panel
The person detail panel displays the complete information of a person that is selected.
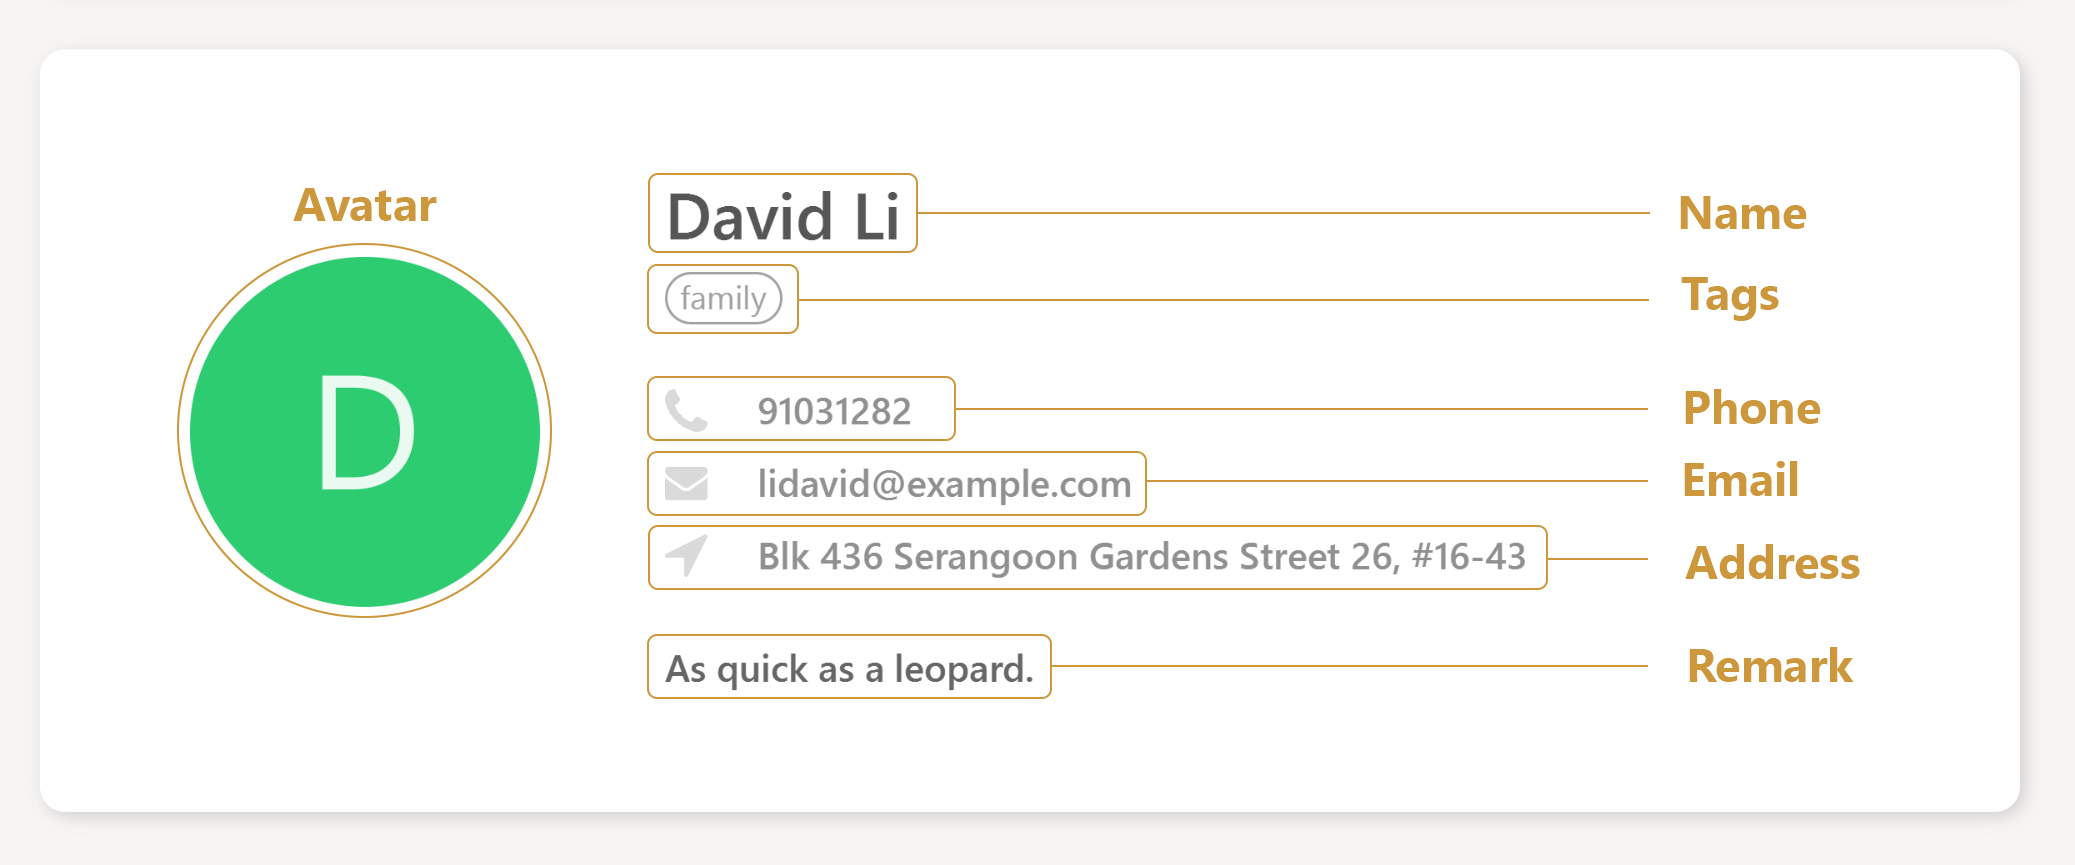
The behavior of the panel is mostly event-driven, where the information displayed on the panel changes depending on various user actions, such as a person selection, editing of a person, addition of a person, etc.
For example, the sequence diagram below shows the sequence of events to update the panel display when the user edits a person (the logic aspect of updating the person detail is omitted for brevity).
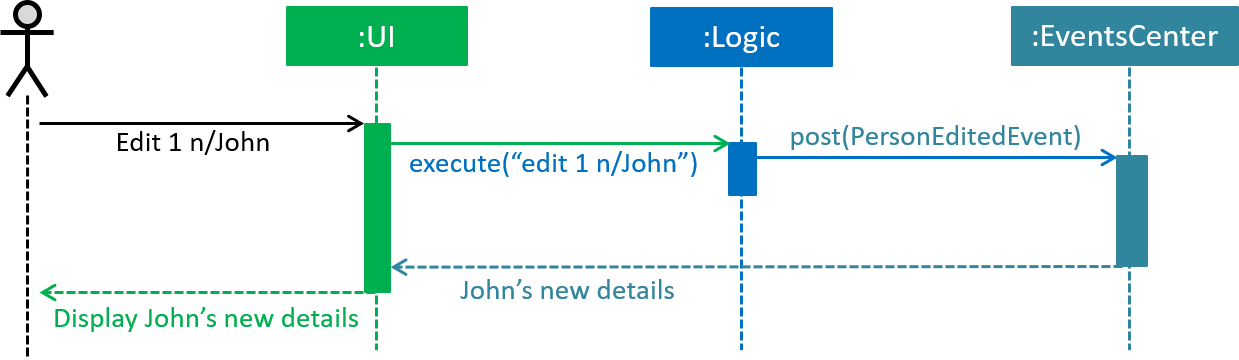
The information displayed on the panel is extracted from the ReadOnlyPerson that is returned by the EventsCenter.
The details of the implementation can be seen from the following code snippets.
/**
* Shows the details of the person on the panel
*/
private void showPersonDetails(ReadOnlyPerson person) {
    setAvatar(person);
    setTextFields(person);
    setTags(person);
}
The showPersonDetails method is called when a PersonEditedEvent is raised, which occurs when the user edits a person.
/**
* Updates the panel when the details of the selected person is changed
*/
@Subscribe
private void handlePersonDetailsChangedEvent(PersonEditedEvent event) {
    logger.info(LogsCenter.getEventHandlingLogMessage(event));
    showPersonDetails(event.editedPerson);
}
The behavior of the panel is summarized in the table below.
| User Action | Panel Behavior |
|---|---|
Select a person |
Display selected person |
Edit a person |
Display newly edited person |
Add a person |
Display newly added person |
Clear the list |
Display empty panel |
Call undo |
Display empty panel |
Call redo |
Behavior as per command that is redone |
Other commands |
No change in display |
4.10.1. Design Considerations
Synchronization of person details with the panel display
Alternative 1 (current choice): Using the event system to update the panel
Pros: Allows for custom panel behavior for different user actions.
Cons: Increase coupling as updating the panel relies on the logic component for user actions involving commands.
Alternative 2: Bind the fields in the panel to their corresponding object properties
Pros: Less coupling.
Cons: Higher implementation overhead to set up the bindings properly and
difficult to enforce custom panel behaviour for specific user actions.
4.11. UI Improvements
The user interface of the application has been revamped to take on a clean design, which aims to improve the user’s experience with Rolodex.
Some improvements made to the UI include the following features:
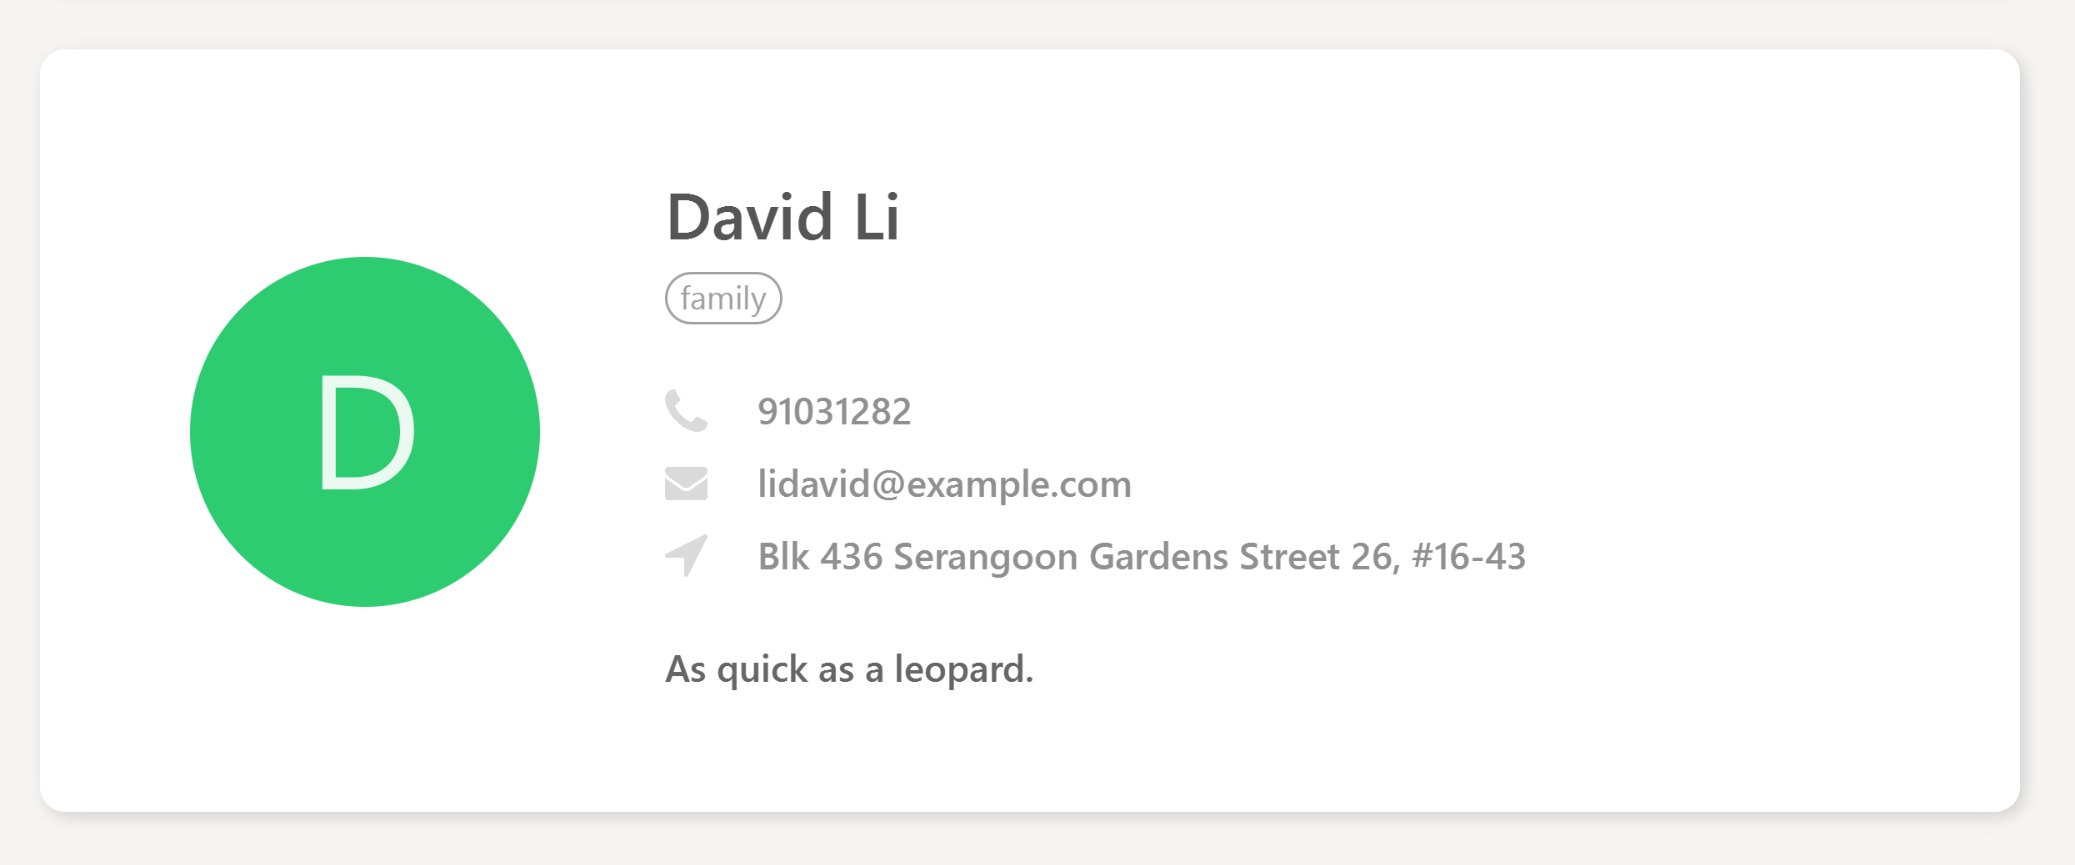
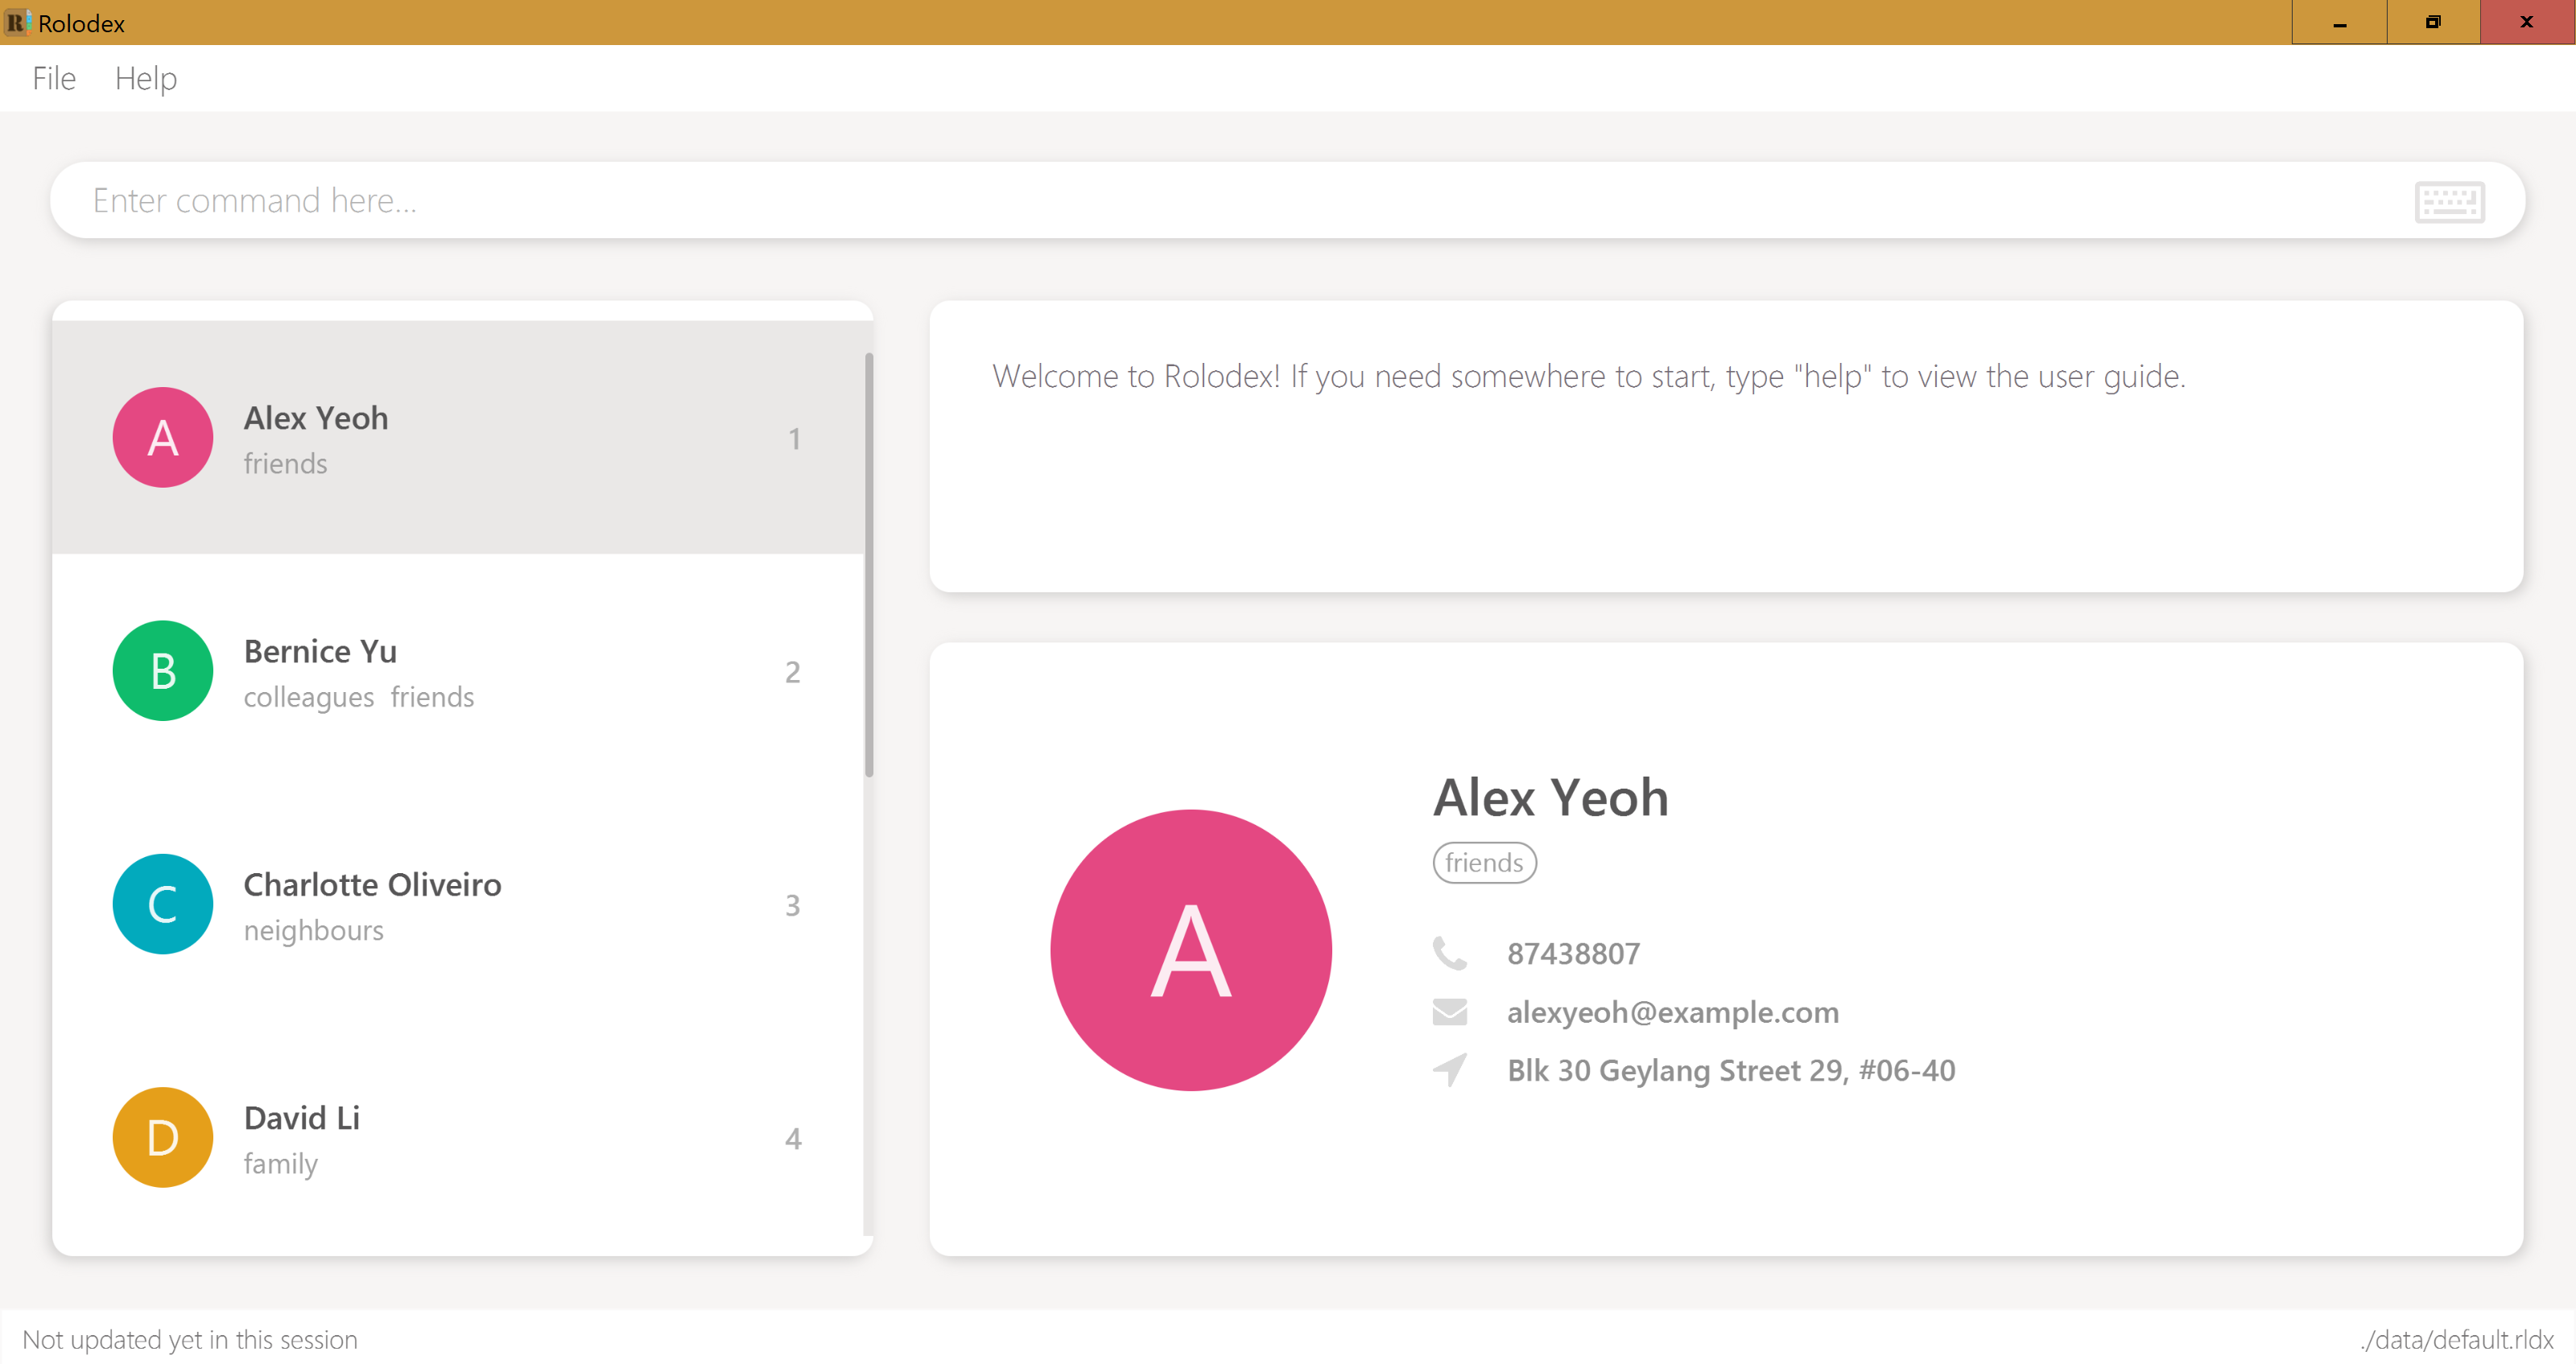
4.11.1. Randomized Avatars Colors
Avatar colors are randomized and generated over a color range to reduce the chance of two adjacent persons sharing the same avatar color. Some results from using this color generator can be seen from the following screenshots.
![]()
![]()
The generation of avatar colors involves two steps:
-
Randomly pick a default color from
ColorsUtil, which contains a list of selected colors chosen from Google’s material ui color palette. -
Generate a randomized offset value to create a new color which values differ from the default color by this offset.
The code snippet below shows the details of how the color values are manipulated in the color generator.
/**
* Generates a new color with a random offset from {@code Color defaultColor}.
*
* @return The new color in hexadecimal {@code String} format
*/
private static String generateNewColor(Color defaultColor) {
    int r = defaultColor.getRed();
    int g = defaultColor.getGreen();
    int b = defaultColor.getBlue();

    int newR = Math.max(COLOR_VALUE_MIN, Math.min(COLOR_VALUE_MAX, (r + generateOffset())));
    int newG = Math.max(COLOR_VALUE_MIN, Math.min(COLOR_VALUE_MAX, (g + generateOffset())));
    int newB = Math.max(COLOR_VALUE_MIN, Math.min(COLOR_VALUE_MAX, (b + generateOffset())));

    return String.format("#%02x%02x%02x", newR, newG, newB);
}
An upper bound is applied to the offset to ensure that the new color does not deviate too far from the default color.
4.11.2. Keyboard Icon
A keyboard icon is added in the command box to provide visual feedback for certain user events:
-
 : User is idle
 -
 : User is typing
 -
 : User entered an invalid command
The keyboard icon is updated by setting ImageView of the icon to one of the three variations as shown above, whichever is appropriate
for the current state of the user.
In particular, to check that the user is idle, we measure the time elapsed since any changes made to the
CommandBox. This is done with the PauseTransition class from JavaFX, which allows us to execute an event after a set duration.
For better illustration, below is a simplified code snippet of the implementation.
private void updateKeyboardIcon() {

    // set icon to typing keyboard

    pause.setOnFinished(event -> {
        // set icon to idle keyboard
    });
    pause.playFromStart(); // reset timer
}
pause is a PauseTransition object, and setOnFinished takes in an event handler as its parameter.
4.11.3. Autoselection for Newly Added/Edited Person
A newly added, or edited person will automatically be selected in the PersonListPanel. This makes it easier for the user to take note
of changes made to their contacts.
This implementation is done by raising an event whenever the add and edit commands are executed.
The PersonListPanel is registered as an event handler and will subsequently scroll to the person that is newly modified.
This feature is integrated with the Person Detail Panel implementation, and more details on the event handling can be found under the section.
4.11.4. Responsive Split Pane
The split pane which separates the contact list from the other UI components is responsive. Its divider is automatically maintained at the optimal position when the window size changes.
This is achieved by setting up listeners to the property of the window. The divider will be repositioned when the listener detects any changes in the window property. The code below illustrates the implementation in greater detail.
private void setSplitPaneDividerPosition() {

    // repositions divider when window is just showed
    primaryStage.showingProperty().addListener((observable, oldValue, newValue) ->
            splitPane.setDividerPositions(SPLIT_PANE_DIVIDER_POSITION));

    // repositions divider when window width changes
    primaryStage.widthProperty().addListener((observable, oldValue, newValue) ->
            splitPane.setDividerPositions(SPLIT_PANE_DIVIDER_POSITION));
}
4.12. Help Window Highlighting
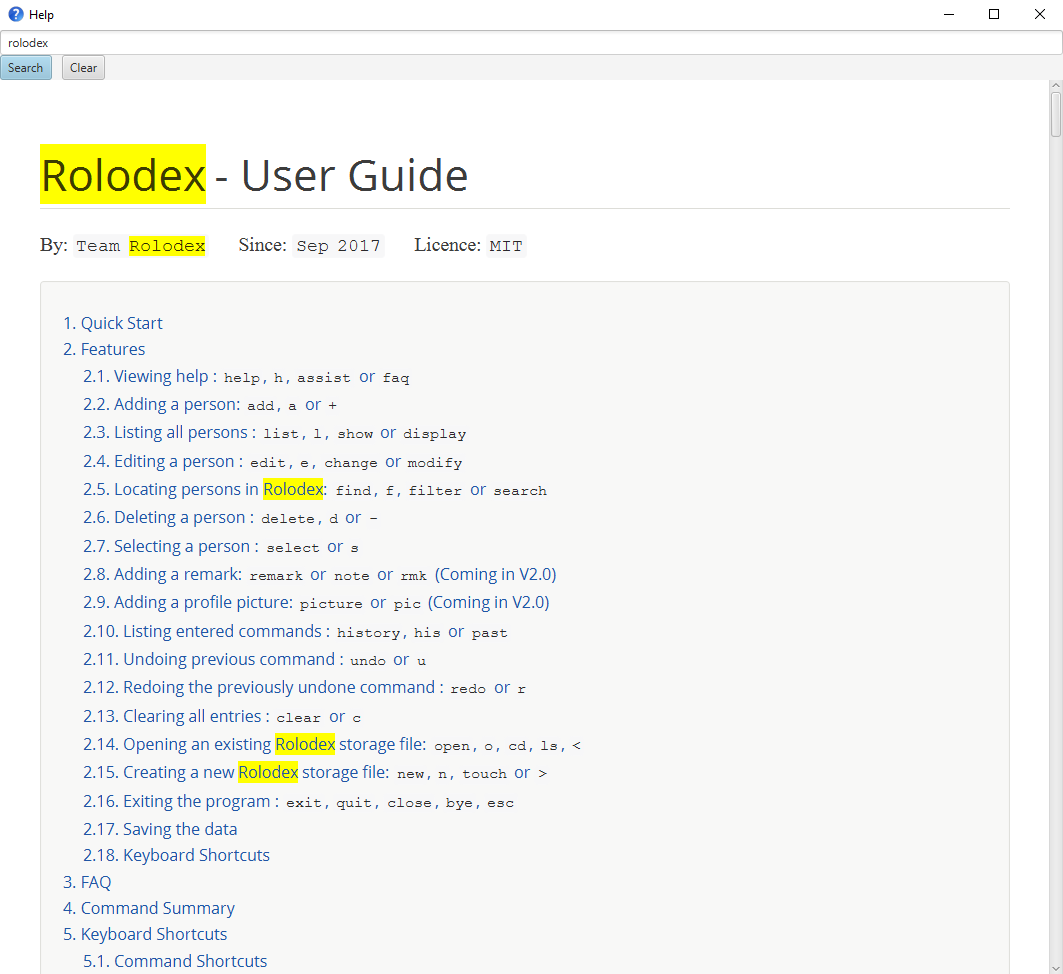
Rolodex uses JavaFx version 8.0.111, where WebView does not support search functionality that mimics Ctrl + F capability of modern web browsers. As a workaround, Johann Burkard’s jQuery text highlighting library is being used to implement such a feature.
Users can easily find keywords by using the highlighting feature of the help window, as opposed to manually looking through the help document for information, which can be counterproductive:
The discussion for JavaFX to implement a native search feature within WebView is ongoing and you can find it here.
4.12.1. Removing jQuery implementation
In a future version of JavaFx where such an implementation is no longer necessary, you may revert the changes by reverting pull request #99 on the Rolodex repo on GitHub. You may also choose to manually do this by reverting the following code:
Original HelpWindow.fxml:
<StackPane fx:id="helpWindowRoot" xmlns="http://javafx.com/javafx/8" xmlns:fx="http://javafx.com/fxml/1">
    <WebView fx:id="browser" />
</StackPane>
HelpWindow.fxml with makeshift user guide search functionality:
<StackPane fx:id="helpWindowRoot" xmlns="http://javafx.com/javafx/8" xmlns:fx="http://javafx.com/fxml/1">
    <VBox fx:id="layout">
        <children>
            <TextField fx:id="txtSearch" promptText="Search and press ENTER" />
                <HBox fx:id="controls">
                    <children>
                        <Button fx:id="btnSearch" mnemonicParsing="false" text="Search">
                            <HBox.margin>
                                <Insets right="10.0" />
                            </HBox.margin>
                        </Button>
                        <Button fx:id="btnClear" mnemonicParsing="false" text="Clear" />
                    </children>
                </HBox>
            <WebView fx:id="browser" minHeight="-Infinity" minWidth="-Infinity" prefHeight="100000.0" />
        </children>
    </VBox>
</StackPane>
Original HelpWindow.java:
@FXML
private WebView browser;

private final Stage dialogStage;

public HelpWindow() {
    super(FXML);
    Scene scene = new Scene(getRoot());
    //Null passed as the parent stage to make it non-modal.
    dialogStage = createDialogStage(TITLE, null, scene);
    dialogStage.setMaximized(true); //TODO: set a more appropriate initial size
    FxViewUtil.setStageIcon(dialogStage, ICON);

    String userGuideUrl = getClass().getResource(HELP_FILE_PATH).toString();
    browser.getEngine().load(userGuideUrl);
}
HelpWindow.java with makeshift user guide search functionality:
@FXML
private WebView browser;

@FXML
private TextField txtSearch;

@FXML
private Button btnSearch;

@FXML
private Button btnClear;

@FXML
private HBox controls;

private final Stage dialogStage;

public HelpWindow() {
    super(FXML);

    txtSearch.setOnAction(event -> {
        if (browser.getEngine().getDocument() != null) {
            highlight(browser.getEngine(), txtSearch.getText());
        }
    });

    btnSearch.setDefaultButton(true);
    btnSearch.setOnAction(actionEvent -> txtSearch.fireEvent(new ActionEvent()));

    btnClear.setOnAction(actionEvent -> clearHighlights(browser.getEngine()));
    btnClear.setCancelButton(true);

    controls.disableProperty().bind(browser.getEngine().getLoadWorker().runningProperty());
    txtSearch.disableProperty().bind(browser.getEngine().getLoadWorker().runningProperty());

    Scene scene = new Scene(getRoot());
    //Null passed as the parent stage to make it non-modal.
    dialogStage = createDialogStage(TITLE, null, scene);
    dialogStage.setMaximized(true); //TODO: set a more appropriate initial size
    FxViewUtil.setStageIcon(dialogStage, ICON);

    String userGuideUrl = getClass().getResource(HELP_FILE_PATH).toString();
    browser.getEngine().load(userGuideUrl);
}

private void highlight(WebEngine engine, String text) {
    engine.executeScript("$('body').removeHighlight().highlight('" + text + "')");
}

private void clearHighlights(WebEngine engine) {
    engine.executeScript("$('body').removeHighlight()");
    txtSearch.clear();
}
Help.adoc passthrough imports:
<script type="text/javascript" src="scripts/jquery-3.2.1.min.js"></script>
<script type="text/javascript" src="scripts/jquery.highlight-5.js"></script>
asciidoctor.css .highlight class:
.highlight{background-color:yellow}4.13. Composing Emails
This functionality is implemented through the EmailCommand class under logic component.
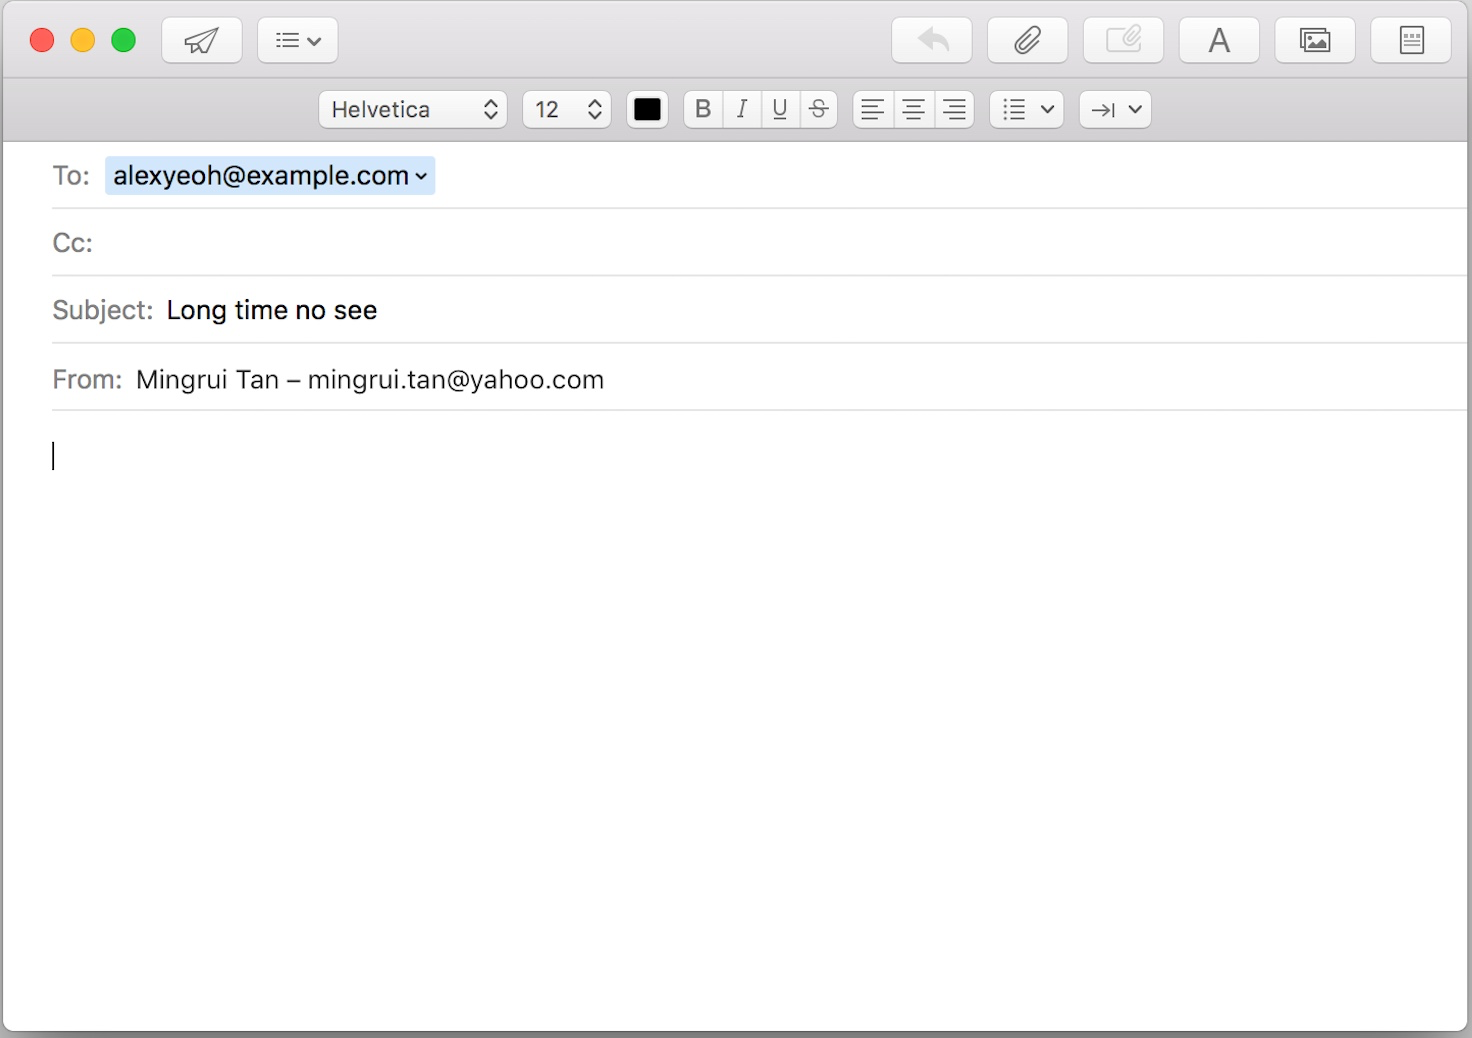
An email command has the following format: Email INDEX [s/SUBJECT] (Subject is an optional field). When the command is executed, the user’s default email client will open
a new compose window. Email address of the contact indicated by INDEX will be filled in as the recipient’s address. SUBJECT (if available) will be filled
in as the subject of the email. The following shows an example of the compose window on Macs.
4.13.1. Using java.awt.Desktop API
Requesting the default email client to open a new compose window is achieved with the java.awt.Desktop class. However, not all platforms support the Desktop API.
Therefore, it is crucial to check whether the API and the MAIL action are supported. A CommandExecption will be thrown if they are not supported.
After confirming that the action can be supported on the platform, an URI (Uniform Resource Identifier) is constructed using the recipient’s email address and subject input by the user (if any).
It is then passed into the mail method of Desktop class. The following code snippet shows the exact implementation.
if (Desktop.isDesktopSupported()
    && Desktop.getDesktop().isSupported(Desktop.Action.MAIL)) {

    Desktop desktop = Desktop.getDesktop();
    try {
        mailtoUri = new URI("mailto:" + recipientEmailAddress
                            + "?subject=" + subject);
        desktop.mail(mailtoUri);
        selectRecipient(targetIndex);
    } catch (URISyntaxException e) {
        e.printStackTrace();
    } catch (IOException e) {
        e.printStackTrace();
    }
    return new CommandResult(String.format(MESSAGE_SUCCESS));
} else {
    throw new CommandException(String.format(MESSAGE_NOT_SUPPORTED));
}
4.13.2. Auto-selecting the Recipient
After the Email command is executed, the recipient will be auto-selected in the contact list,
so that the person’s details can be displayed at contact detail panel. As an example the following screenshot shows
the behaviour of Rolodex after executing the command Email 1. The contact at index 1 is selected.
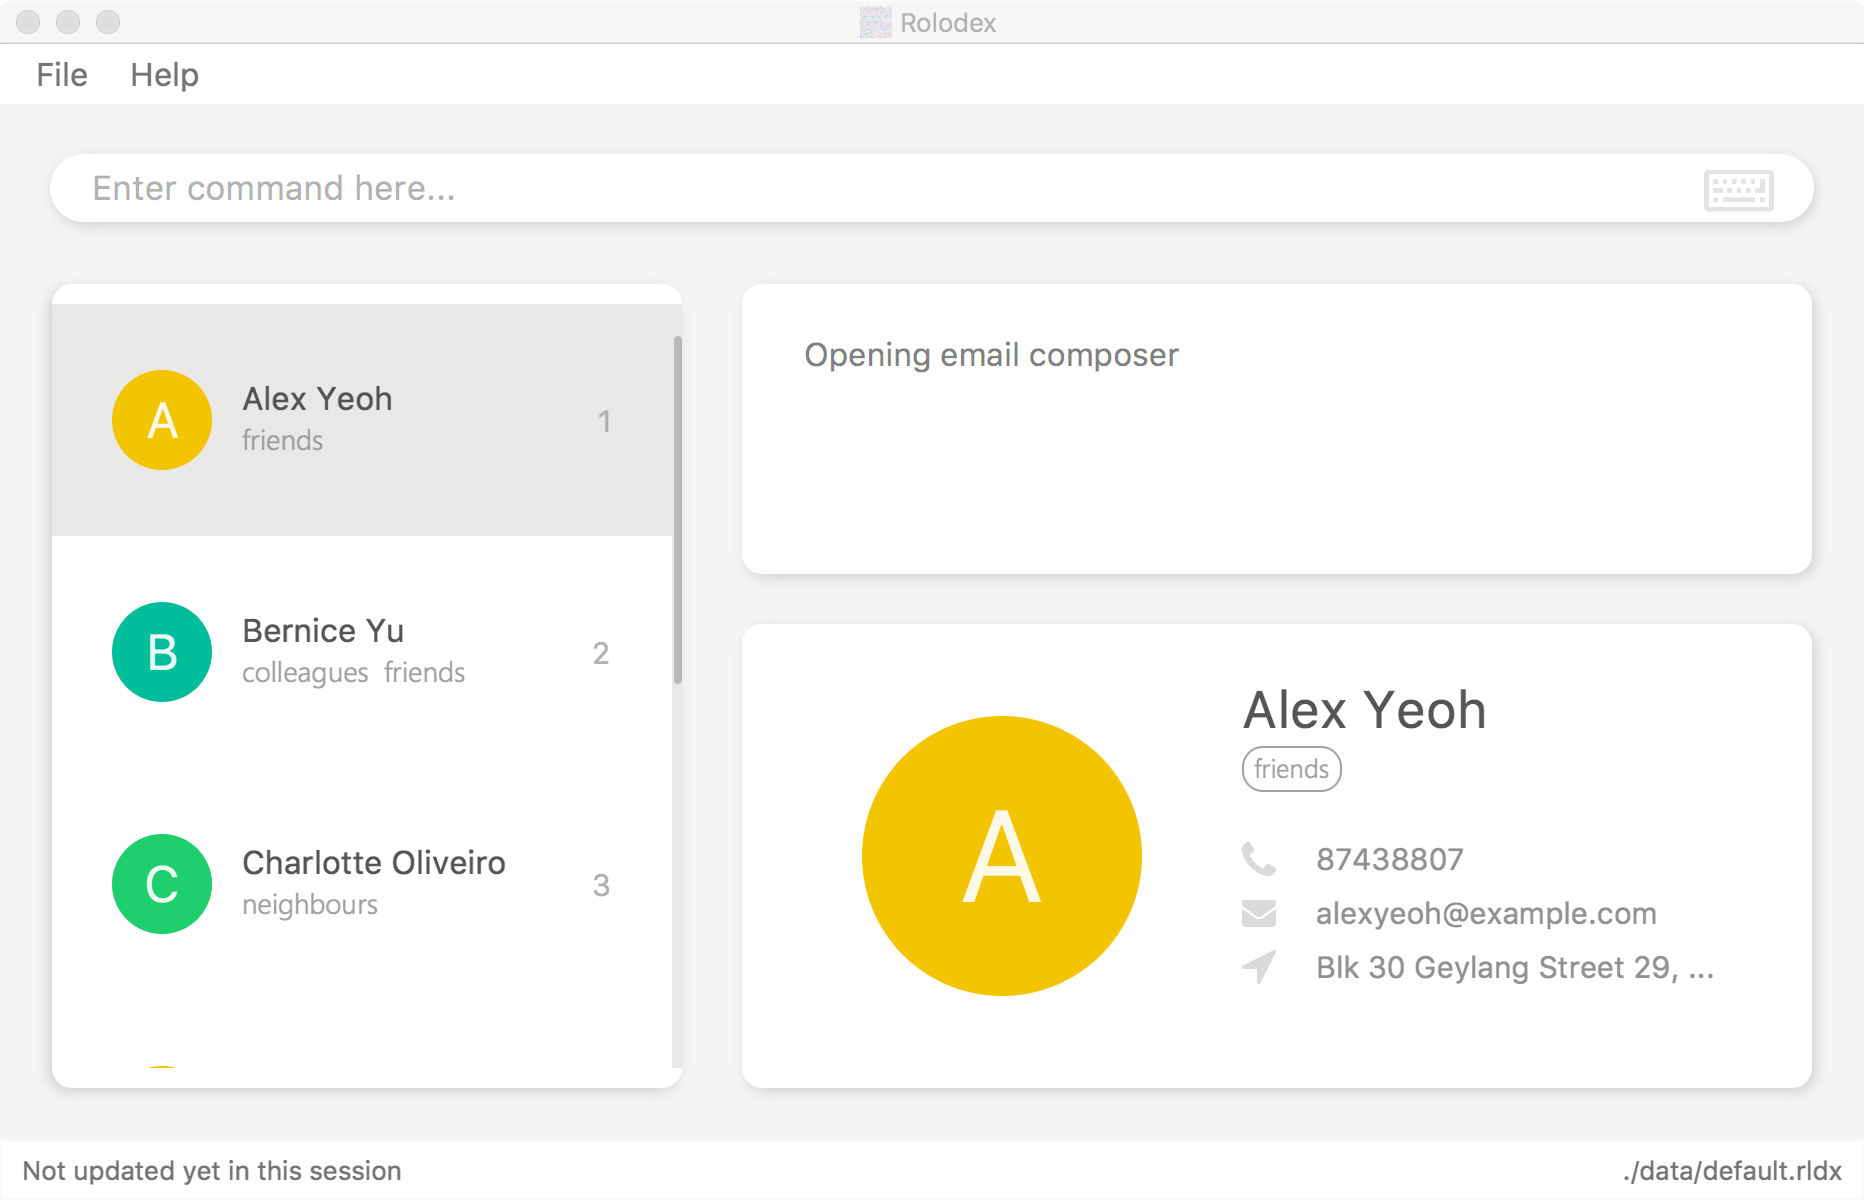
This is for the user to confirm that they have typed in the correct index. With the person’s name and contact details displayed, it is easy to double-check if the contact is the intended recipient.
This action is performed through the selectRecipient(targetIndex) method call during the execution of EmailCommand, which can be found in the
code snippet above. The selectRecipient method posts a JumpToListRequestEvent with the recipient’s index, which will perform the selection in Contact List.
The method is shown below.
private void selectRecipient(Index index) {
    EventsCenter.getInstance().post(new JumpToListRequestEvent(index));
}
4.13.3. Email Command Parser
EmailCommandParser class is used to parse input arguments in the context of the EmailCommand. It maps the positive integer in the argument to INDEX,
and the string following the prefix s/ to SUBJECT. If the user did not input a subject, the subject would be an empty string.
The SUBJECT string must be percent-encoded, which means all the spaces must be replaced with %20. This is to follow the URI syntax standard.
Otherwise a java.net.URISyntaxException would be thrown when sending the URI. Above mentioned implementation is shown in the code snippet below.
String subject = ParserUtil.parseSubject(argMultimap.getValue(PREFIX_SUBJECT)).orElse("");
subject = subject.replaceAll(" ", "%20");
Index index = ParserUtil.parseIndex(argMultimap.getPreamble());
4.14. Suggestions Mechanism
The suggestion mechanism is implemented at Rolodex’s parser level under the logic component.
The suggestion is stored as an instance object to be evaluated only if the next command matches any of the suggestion’s affirmation commands, y, yes, k, ok, yea or yeah, otherwise, the suggestion is destroyed.
Upon receiving a bogus command, the command string is evaluated by the suggestion object which determines if it can be turned into a valid suggestion to be executed.
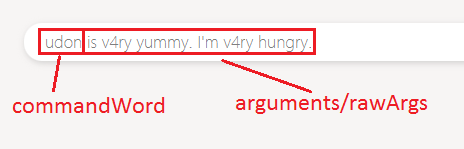
For this section’s explanation of the suggestions mechanism, the terms commandWord, arguments or rawArgs are usually a reference to the following:
-
commandWord: The first resulting word in a whitespace delimited string.
-
rawArgs: The raw argument string to be parsed for the suggestion, after excluding the commandWord.
-
arguments: Can be the same meaning or rawArgs or mean arguments in a broader context. Please adjust to the context if necessary.
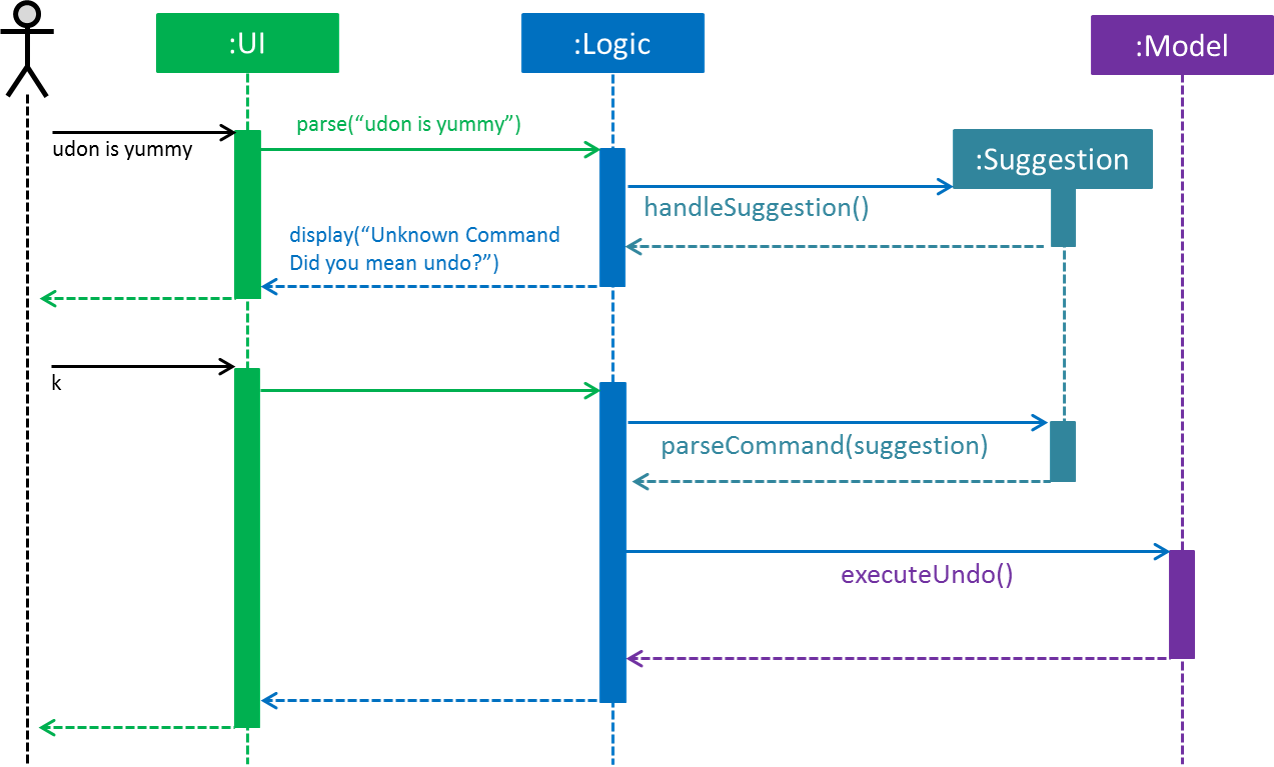
The high level sequence diagram for a bogus udon is yummy request can be seen below:
-
User enters a bogus command
udon is yummy. -
RolodexParserparses the command and separates the stringudon is yummyinto the commandWord,udonand arguments,is yummy.-
udonis not a recognized command word -
The execution is passed on to a new Suggestion instance.
-
-
Suggestion determines which command abbreviation
udonis closest to up to a specified threshold, which in this case, isundo.-
Since
undodoes not require any arguments, the supplied argumentsis yummyare ignored -
The suggestion is noted as a suggestible exception.
-
-
The suggestion is stored as an instance variable in
RolodexParser. -
RolodexParserthrows aSuggestibleParseExceptionto be handled separately fromParseExceptionby UI elements.-
The
CommandBoxis cleared to make way for the user to easily enter any of the suggestion affirmation commands. -
The
ResultDisplaypanel displays a formatted string for the suggestion of the command to be alternatively executed.
-
-
At this point, the user enters an affirmation command,
kfor theRolodexParserto be handled. -
As a suggestion is present in
RolodexParser, the user inputkis converted into the parsedSuggestionand handled as usual.
The behaviour of the undo operation remains unchanged, as explained in the Undo/Redo Mechanism section.
The suggestions are not limited undo commands and are applicable to all commands in the Rolodex.
Levenshtein distance is used to determine the closest command to the whitespace delimited first user input.
If two command abbreviations are of equal distance to the bogus word, an arbitrary command is selected for the suggestion.
The suggestions are handled differently by different types of Command.
4.14.1. Commands with No Arguments
The behaviour of commands that are known to have no arguments by default, namely,
-
Clear -
List -
History -
Exit -
Help -
Undo -
Redo
are handled in a manner similar to undo as described above. The arguments are ignored.
4.14.2. Commands with a Single Index Type Argument
The commands that hold a single, indexed type argument are
-
Delete -
Select
These commands require an argument of an index type, within the range from 1 to the total number of persons in the Rolodex. The behaviour of index parsing can be seen as such:
public static int parseFirstIndex(String value, int rolodexSize) throws NumberFormatException {
    Matcher m = Pattern.compile(INDEX_VALIDATION_REGEX).matcher(value);
    while (m.find()) {
        int firstIndex = Math.abs(Integer.parseInt(m.group()));
        if (firstIndex > 0 && firstIndex <= rolodexSize) {
            return firstIndex;
        }
    }
    throw new NumberFormatException();
}
The algorithm searches for instances of an integer in the supplied string and checks if it falls within the possible range of indices.
If no more integers can be found, the method throws a NumberFormatException to be converted into an non-suggestible ParseException.
Sometimes users may include the index in the command word, without a whitespace separation. To handle such a case, we first look for the index within the arguments, as usual. If no valid indices are found, we search the command word instead.
For example, the invalid command string s3lect,

-
RolodexParserdetermines that the closest command word tos3lectisselectand use parse logic for single index typed arguments. -
The parser would attempt to search for an index in the empty arguments and fail.
-
The parser then attempts to search for an index in the command word and finds
3. -
The parser builds the arguments into the formatted command string,
select 3and prompts the user:
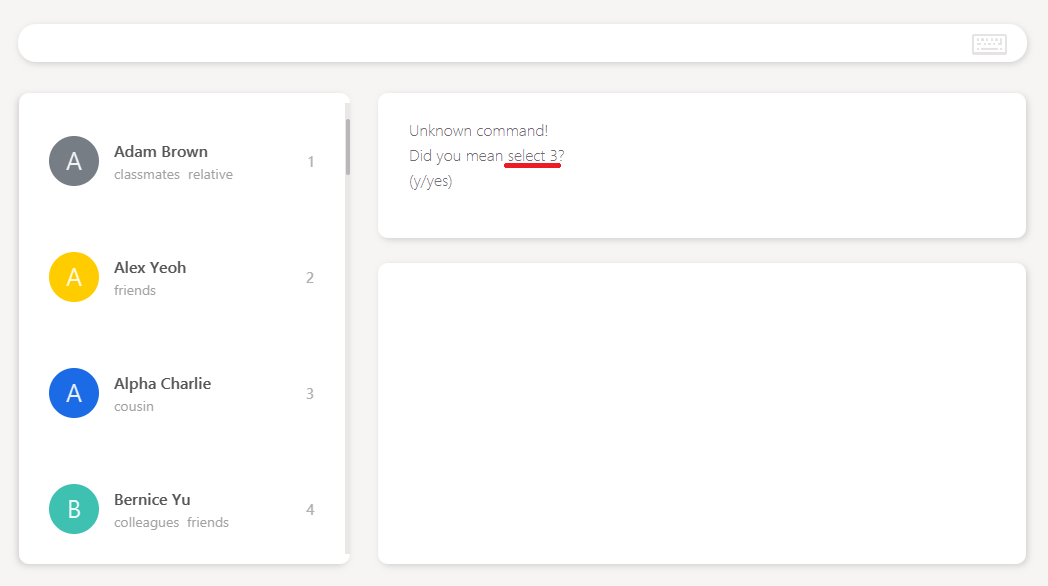
Should the user choose to execute the prompted command, the person Alpha Charlie would be selected.
4.14.3. Commands with Directory Type Arguments
The commands that hold a single file path argument are
-
Open -
New
Arguments for these commands are parsed by using the same filepath validation as seen in Open File and New File Mechanism, except with looser regex that does not validate from the beginning to the end of the string given.
public static final String FILEPATH_REGEX_NON_STRICT = "(.+)/([^/]+)";The rest of the string is then formatted into a valid file path and a .rldx extension is added to the end of the string.
public static String parseFirstFilePath(String value) throws IllegalArgumentException {
    Matcher m = Pattern.compile(FILEPATH_REGEX_NON_STRICT).matcher(replaceBackslashes(value).trim());
    if (m.find() && isValidRolodexStorageFilepath(m.group())) {
        return m.group().replaceAll(ROLODEX_FILE_EXTENSION, "").trim() + ROLODEX_FILE_EXTENSION;
    }
    throw new IllegalArgumentException();
}
4.14.4. Find Command Suggestions
The find command uses a simpler suggestion format by simply taking all arguments, checking if it is not empty and returning it all together.
public static String parseArguments(String rawArgs) {
    // Check if null and is a non-empty string.
    requireNonNull(rawArgs);
    if (!rawArgs.trim().isEmpty()) {
        return " " + rawArgs.trim();
    }
    return null;
}
4.14.5. Remark/Email Command Suggestions
The Remark and Email command are in the format of
-
a command word followed by,
-
an index then,
-
a memo field.
For the remark command, the memo is simply the remark to be entered into the person’s remark field, preceded by the prefix r/.
The email command’s memo field is the subject of the email to be sent, preceded by the prefix s/.
Similar to Commands with a Single Index Type Argument, if the index does not exist in the arguments, the command word is checked instead.
public static String parseArguments(String commandWord, String rawArgs) {
    // Check if index (number) exists, removes Remark prefix (if it exists) and re-adds it before returning.
    if (isParsableIndex(rawArgs, getLastRolodexSize())) {
        String indexString = Integer.toString(parseFirstIndex(rawArgs, getLastRolodexSize()));
        String remark = parseRemoveFirstIndex(rawArgs, getLastRolodexSize()).trim().replace(PREFIX_REMARK.toString(), "");
        return " " + indexString + " " + PREFIX_REMARK + remark;
    } else if (isParsableIndex(commandWord, getLastRolodexSize())) {
        String indexString = Integer.toString(parseFirstIndex(commandWord, getLastRolodexSize()));
        String remark = rawArgs.trim().replace(PREFIX_REMARK.toString(), "");
        return " " + indexString + " " + PREFIX_REMARK + remark;
    }
    return null;
}
However, instead of stopping at the index, the remainder of the arguments after the index has been removed is parsed as the memo field’s contents.
4.14.6. Add Command Suggestions
When adding a new person, we have to note that a Person has four compulsory fields, Name, Phone, Email and Address.
Tag and Remark are optional and have to be handled accordingly.
The implementation for Add suggestions follow a decision flow model that can be seen through the following activity diagram, from AddCommandParser.parseArguments(rawArgs) execution point of view:
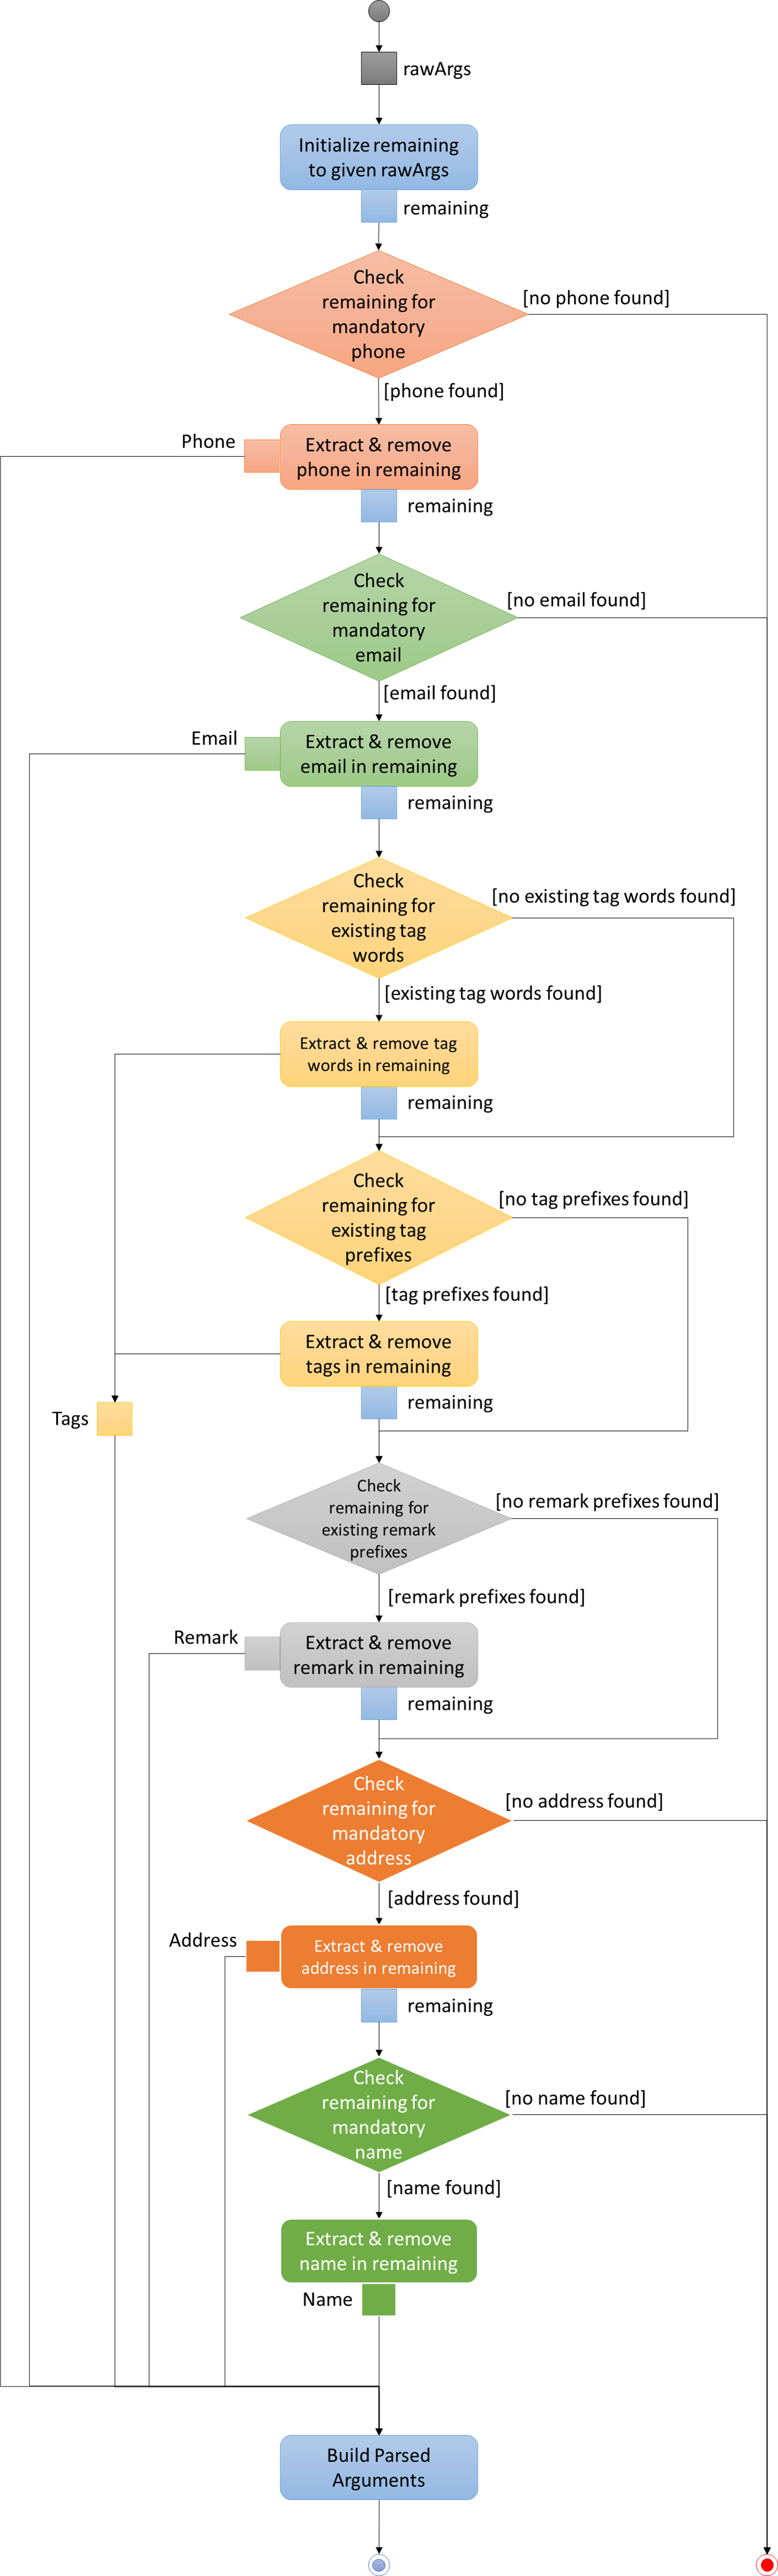
During the handling of a suggestible command arguments for an Add command,
-
rawArgsis set to be the initial value of the remaining arguments. -
Mandatory
Phoneis checked first. If present, extract, remove and continue. Otherwise stop execution and return as non-suggestible.-
Phones are expected to match the phone regex,
-
having a minimum of digits, or
-
optionally prepended with a
+, -
making it easily distinguishable from other numeric formats like the index, building numbers or postal codes.
-
-
Mandatory
Emailis checked. If present, extract, remove and continue. Otherwise stop execution and return as non-suggestible.-
Emails are expected to have the
@character inside them and regex matching is straightforward, -
making emails easily distinguishable from other fields.
-
-
Existing
Tagwords are checked. If present, extract, remove and continue. Otherwise continue.-
Words (remaining string delimited by whitespace) that are also tags in the Rolodex session are existing tag words.
-
-
Tag prefixes (
t/) are checked. If present, extract, remove and continue. Otherwise continue.-
t/TAGbehavior as per normal.
-
-
Remark prefixes (
r/) are checked. If present, extract, remove and continue. Otherwise continue.-
r/REMARKSbehavior as per normal.
-
-
Mandatory
Addressis checked. If present, extract, remove and continue. Otherwise stop execution and return as non-suggestible.-
Addresses commonly begin with
Blk,Blockor a short number -
Addresses are expected to be entered after a name (i.e.
COMMAND NAME … ADDRESS), making it highly possible to obtain the address by getting the substring from the first occurrence ofBlk,Blockor the number to the end of the remaining string.
-
-
Mandatory
Nameis checked. If present, extract, remove and continue. Otherwise stop execution and return as non-suggestible.-
Name is the last mandatory argument to be parsed.
-
Name must be non-empty and matches the defined name regex.
-
The unpredictable nature of name words makes it difficult to identify a person’s name.
-
As seen in
Address, ifNameis entered after (to the right of)Address, there would be no remaining words to be parsed. SinceNamemust be non-empty, if it is empty, thenNameis not present.
-
-
Build the arguments into a formatted command argument string.
| As observed via the decision flow, the suggestion does not always suggest the correct format so it is up to the user to validate the command. |
Any missing compulsory fields will result in an immediate failure of the command as specified by a person’s requirements. Optional arguments, on the other hand, may not be present and are represented as empty strings when sent to the final argument builder.
If any of the prefixes are missing, they will be added when the parsed arguments are built, with the exception of remarks and tags with prefixes.
Given a typical unformatted add command string without prefixes add Bobby Lee bobby@lee.com 583 Lexington Avenue NY 10048 friends 95849301:

We should receive the following suggestion Did you mean add n/Bobby Lee p/95849301 e/bobby@lee.com a/583 Lexington Avenue NY 10048 t/friends?:
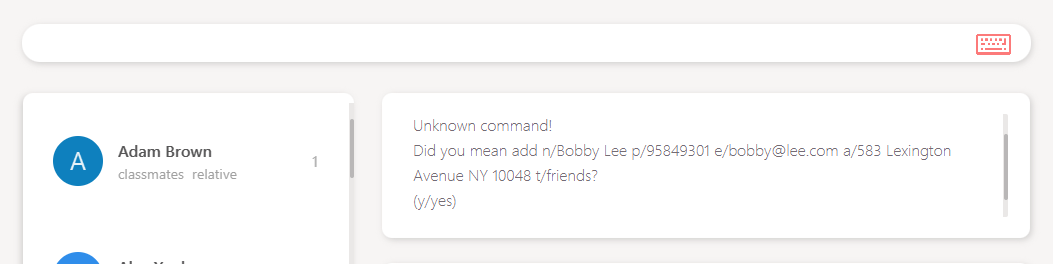
Using the decision flow modeled above, we can see that the argument suggestions were parsed in the following order:
-
Bobby’s phone,
95849301is detected as a long number and is extracted first. -
The email,
bobby@lee.comis detected as the@character is present and is extracted. -
The tag,
friendsis an existing tag in the currently loaded Rolodex and we can extractfriendsas a tag. -
The address,
583 Lexington Avenue NY 10048begins with a short number and will be picked up till the end of the remaining string. -
The remainder of the arguments should only contain
Bobby Leeand is matched as his name.
As the Add command’s decision flow requires many acyclic execution paths to its parser, its corresponding NPath complexity
is known to be large.
|
4.14.7. Edit Command Suggestions
Unlike the Add command, the Edit command only requires optional (minimum 1) fields and we handle all fields as such.
However, the Edit command also requires a mandatory argument of an index type,
similar to Remark/Email Command Suggestions.
The implementation for Edit suggestions follow a decision flow model that can be seen through the following activity diagram, from EditCommandParser.parseArguments(commandWord, rawArgs) execution point of view:
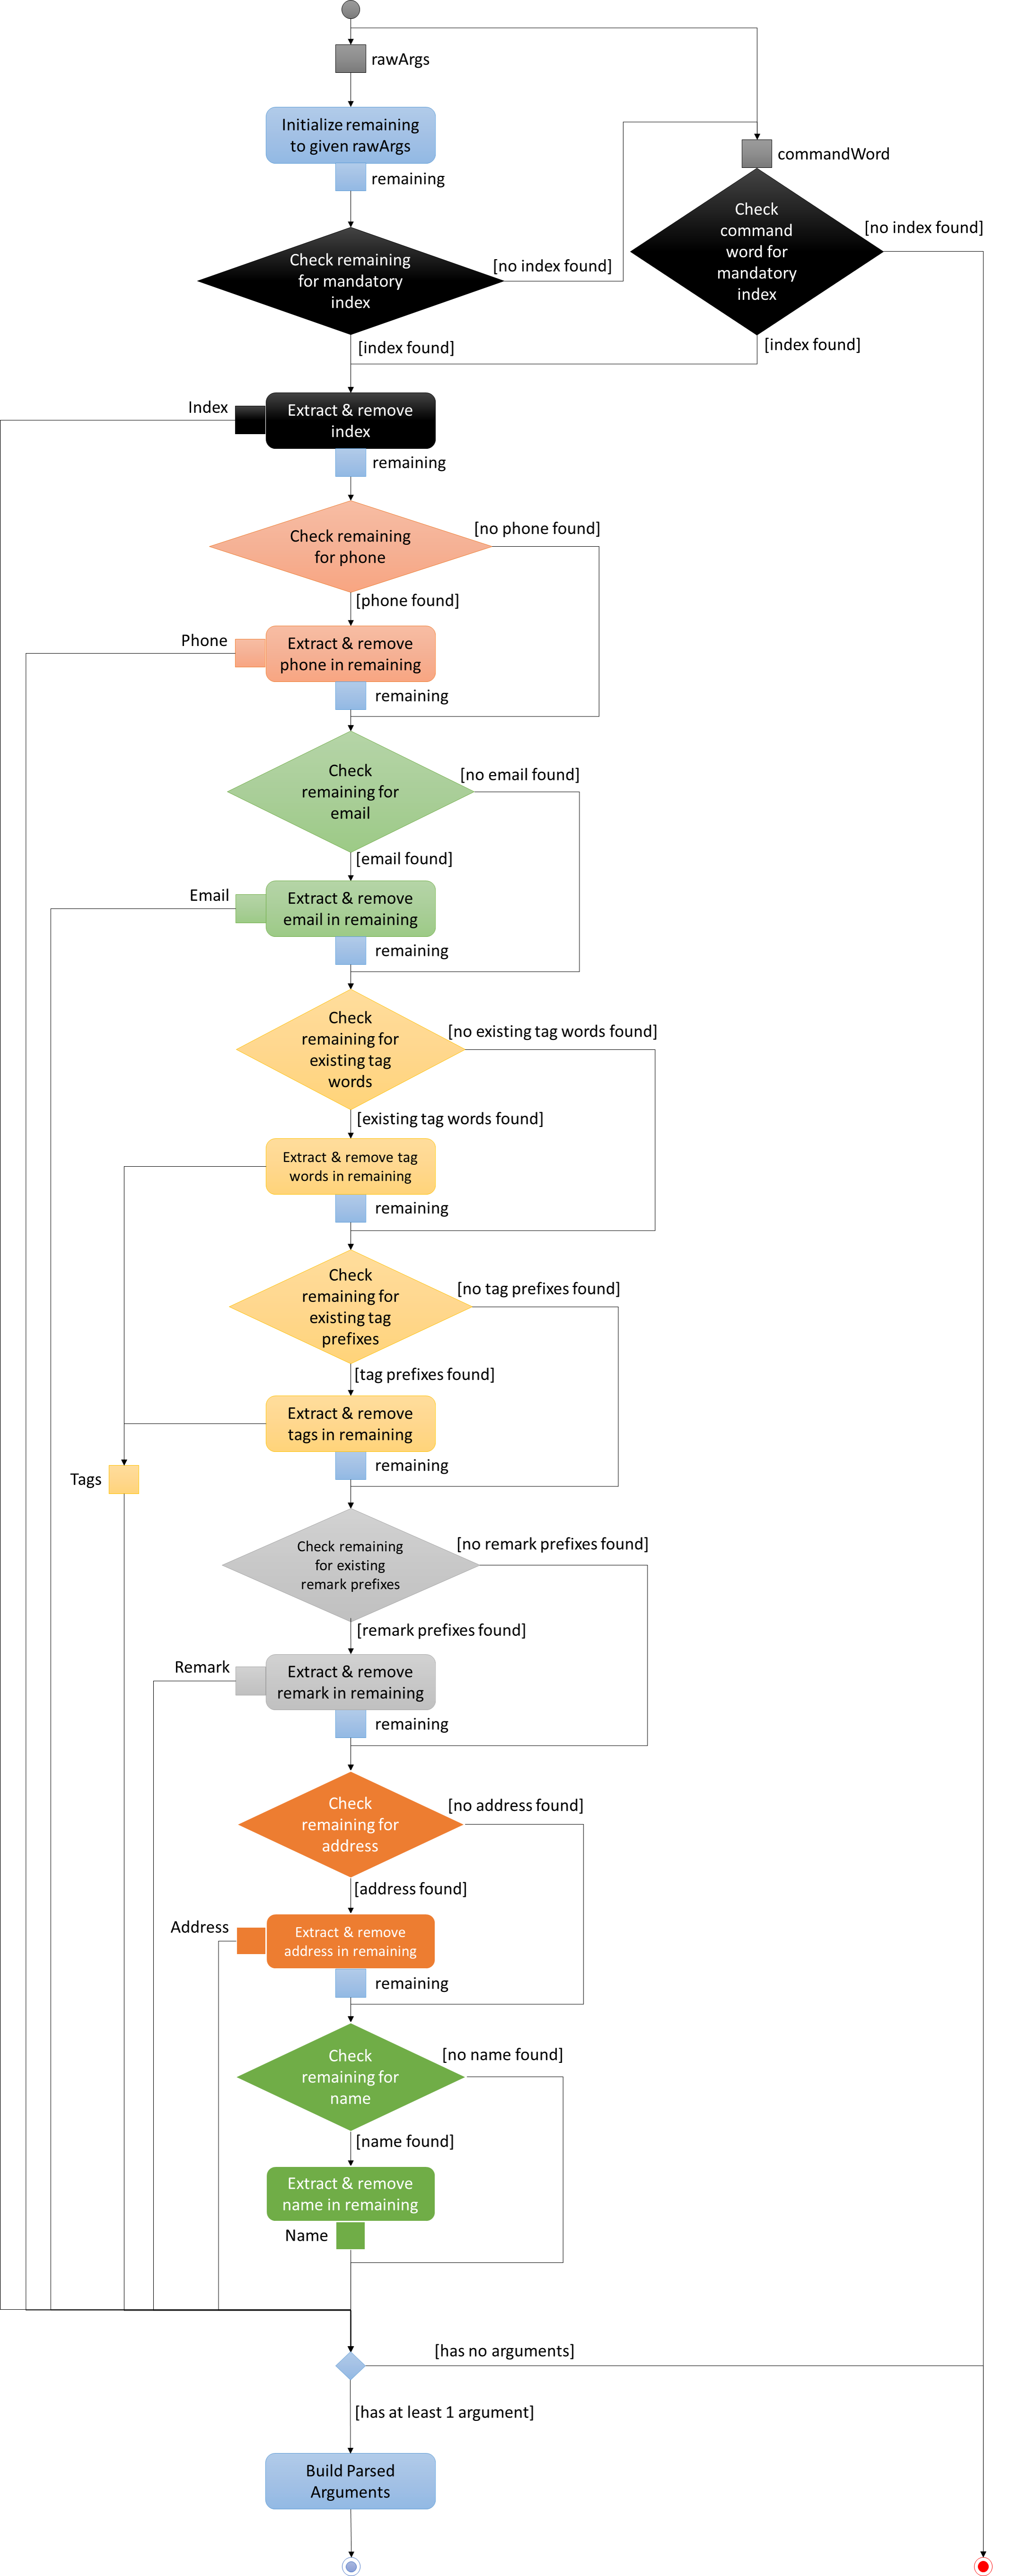
During the handling of a suggestible command arguments for an Edit command,
-
rawArgsis set to be the initial value of the remaining arguments. -
Mandatory
Indexis checked in the remaining arguments first. If present, extract, remove and continue. Otherwise,-
Mandatory `Index is checked in command word. If present, extract, remove and continue. Otherwise stop execution and return as non-suggestible.
-
Index extraction is similar to behavior in Commands with a Single Index Type Argument section.
-
-
Optional
Phoneis checked first. If present, extract, remove and continue. Otherwise continue.-
Phones are expected to match the phone regex,
-
having a minimum of digits, or
-
optionally prepended with a
+, -
making it easily distinguishable from other numeric formats like the index, building numbers or postal codes.
-
-
Optional
Emailis checked. If present, extract, remove and continue. Otherwise continue.-
Emails are expected to have the
@character inside them and regex matching is straightforward, -
making emails easily distinguishable from other fields.
-
-
Existing
Tagwords are checked. If present, extract, remove and continue. Otherwise continue.-
Words (remaining string delimited by whitespace) that are also tags in the Rolodex session are existing tag words.
-
-
Tag prefixes (
t/) are checked. If present, extract, remove and continue. Otherwise continue.-
t/TAGbehavior as per normal.
-
-
Remark prefixes (
r/) are checked. If present, extract, remove and continue. Otherwise continue.-
r/REMARKSbehavior as per normal.
-
-
Optional
Addressis checked. If present, extract, remove and continue. Otherwise continue.-
Addresses commonly begin with
Blk,Blockor a short number -
Addresses are expected to be entered after a name (i.e.
COMMAND NAME … ADDRESS), making it highly possible to obtain the address by getting the substring from the first occurrence ofBlk,Blockor the number to the end of the remaining string.
-
-
Optional
Nameis checked. If present, extract, remove and continue. Otherwise continue.-
Name is the last argument to be parsed.
-
Name must be non-empty and matches the defined name regex.
-
The unpredictable nature of name words makes it difficult to identify a person’s name.
-
As seen in
Address, ifNameis entered after (to the right of)Address, there would be no remaining words to be parsed. SinceNamemust be non-empty, if it is empty, thenNameis not present.
-
-
If no arguments exist (i.e.
Name,Phone,Email,Address,Tag,Remarkare all empty strings), return as non-suggestible. Otherwise, build the arguments into a formatted command argument string.
| As observed via the decision flow, the suggestion does not always suggest the correct format so it is up to the user to validate the command. |
Any missing or invalid index would result in an immediate failure of the command as specified by the command specifications.
Optional arguments, on the other hand, may not be present and are represented as empty strings when sent to the final argument builder.
However, if completely no arguments exist (e.g. edit 1), the Edit parser would fail a well, defaulting to the original behavior.
If any of the prefixes are missing, they will be added when the parsed arguments are built, with the exception of remarks and tags with prefixes.
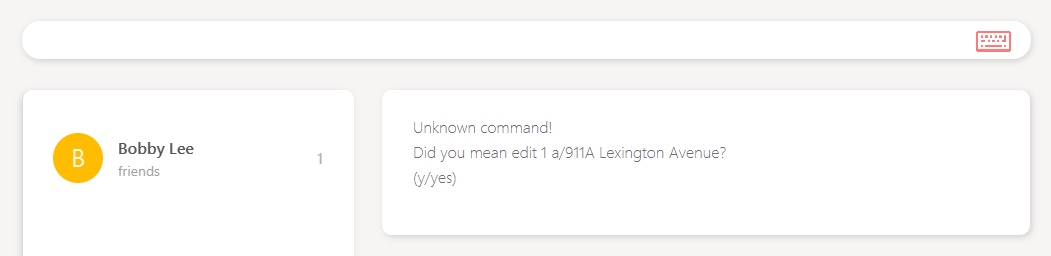
Given a typical unformatted edit command string with an invalid address prefix edit1 p/911A Lexington Avenue:
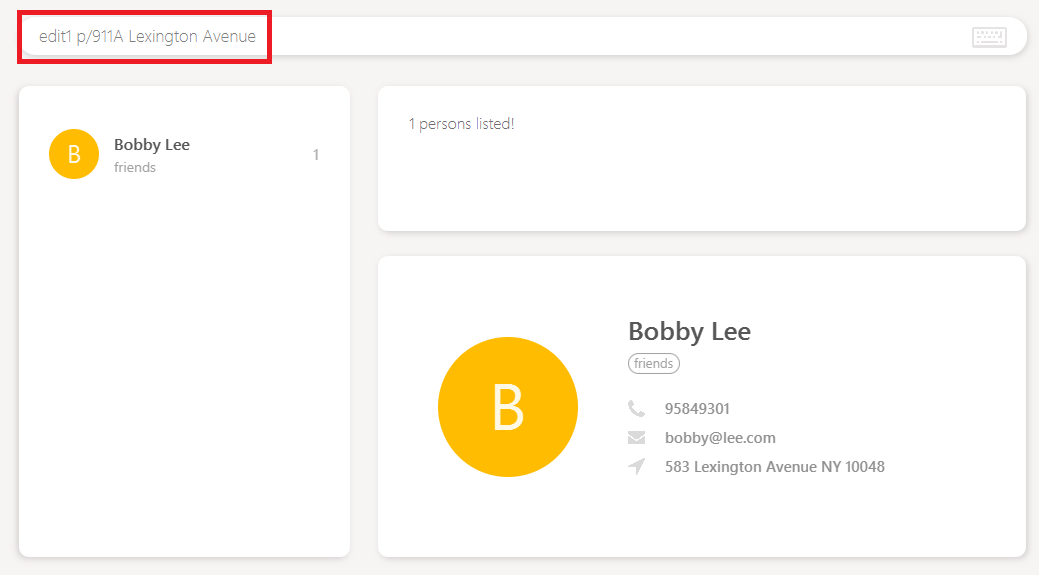
We should receive the following suggestion Did you mean edit 1 a/911A Lexington Avenue?:
Using the decision flow modeled above, we can see that the argument suggestions were parsed in the following order:
-
The index,
1is incorrectly placed within the command word.911is attempted but since 911 is greater than the Rolodex’s size, no index can be found in the arguments. -
The index,
1is matched in the command word and extracted. -
No phone is matched.
911is detected as a short number and is skipped. The prefixp/is removed. -
No email is matched.
-
No tags are matched.
-
No remarks are matched.
-
The address,
911A Lexington Avenuebegins with a short number and will be picked up till the end of the remaining string. -
The remainder of the arguments are empty when trimmed.
-
Address is the only valid optional field present and the command is suggested as
edit 1 a/911A Lexington Avenue.
As the Edit command’s decision flow requires many acyclic execution paths to its parser, its corresponding NPath complexity
is known to be large.
|
4.14.8. Design Considerations
Add/Edit Field Matching
Alternative 1 (current choice): Parsing easy fields first, then parsing address before name in the Add command.
Pros: Application behaves sufficiently well and efficiently in matching field data given certain input assumptions.
Pros: Shallow learning curve for new users to learn application functions.
Cons: Extremely high NPath complexity
Cons: Deviates from the Object-Oriented nature of the codebase into a procedural/functional style.
Alternative 2: Dictionary analysis of field data.
Pros: Easier logic to understand for new developers.
Cons: Maintaining dictionary would be taxing on the development team and may get outdated as data keeps getting outdated.
Cons: Memory performance decreases drastically as memory has to be used to load dictionary into memory for field analysis.
Cons: Storage performance decreases drastically as space has to be used to store dictionary.
Alternative 3: No suggestions for add/edit
Pros: Clean codebase.
Cons: Steep learning curve for new users to learn application functions.
4.15. Logging
We are using java.util.logging package for logging. The LogsCenter class is used to manage the logging levels and logging destinations.
-
The logging level can be controlled using the
logLevelsetting in the configuration file (See Configuration) -
The
Loggerfor a class can be obtained usingLogsCenter.getLogger(Class)which will log messages according to the specified logging level -
Currently log messages are output through:
Consoleand to a.logfile.
Logging Levels
-
SEVERE: Critical problem detected which may possibly cause the termination of the application -
WARNING: Can continue, but with caution -
INFO: Information showing the noteworthy actions by the App -
FINE: Details that is not usually noteworthy but may be useful in debugging e.g. print the actual list instead of just its size
4.16. Configuration
Certain properties of the application can be controlled (e.g App name, logging level) through the configuration file (default: config.json).
5. Documentation
We use asciidoc for writing documentation.
| We chose asciidoc over Markdown because asciidoc, although a bit more complex than Markdown, provides more flexibility in formatting. |
5.1. Editing Documentation
See UsingGradle.adoc to learn how to render .adoc files locally to preview the end result of your edits.
Alternatively, you can download the AsciiDoc plugin for IntelliJ, which allows you to preview the changes you have made to your .adoc files in real-time.
5.2. Publishing Documentation
See UsingTravis.adoc to learn how to deploy GitHub Pages using Travis.
5.3. Converting Documentation to PDF Format
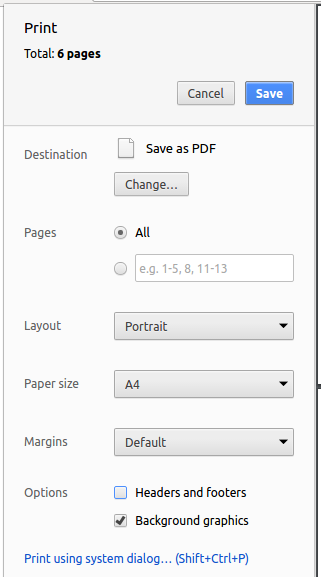
We use Google Chrome for converting documentation to PDF format, as Chrome’s PDF engine preserves hyperlinks used in webpages.
Here are the steps to convert the project documentation files to PDF format.
-
Follow the instructions in UsingGradle.adoc to convert the AsciiDoc files in the
docs/directory to HTML format. -
Go to your generated HTML files in the
build/docsfolder, right click on them and selectOpen with→Google Chrome. -
Within Chrome, click on the
Printoption in Chrome’s menu. -
Set the destination to
Save as PDF, then clickSaveto save a copy of the file in PDF format. For best results, use the settings indicated in the screenshot below.
6. Testing
Testing ensures that our software works as expected. In Rolodex, we use several frameworks for running tests.
6.1. Running Tests
There are three ways to run tests.
| The most reliable way to run tests is the 3rd one. The first two methods might fail some GUI tests due to platform/resolution-specific idiosyncrasies. |
Method 1: Using IntelliJ JUnit test runner
-
To run all tests, right-click on the
src/test/javafolder and chooseRun 'All Tests' -
To run a subset of tests, you can right-click on a test package, test class, or a test and choose
Run 'ABC'
Method 2: Using Gradle
-
Open a console and run the command
gradlew clean allTests(Mac/Linux:./gradlew clean allTests)
| See UsingGradle.adoc for more info on how to run tests using Gradle. |
Method 3: Using Gradle (headless)
Thanks to the TestFX library we use, our GUI tests can be run in the headless mode. In the headless mode, GUI tests do not show up on the screen. That means the developer can do other things on the Computer while the tests are running.
To run tests in headless mode, open a console and run the command gradlew clean headless allTests (Mac/Linux: ./gradlew clean headless allTests)
6.2. Types of Tests
We have two types of tests:
-
GUI Tests - These are tests involving the GUI. They include,
-
System Tests that test the entire App by simulating user actions on the GUI. These are in the
systemtestspackage. -
Unit tests that test the individual components. These are in
seedu.address.uipackage.
-
-
Non-GUI Tests - These are tests not involving the GUI. They include,
-
Unit tests targeting the lowest level methods/classes.
e.g.seedu.address.commons.StringUtilTest -
Integration tests that are checking the integration of multiple code units (those code units are assumed to be working).
e.g.seedu.address.storage.StorageManagerTest -
Hybrids of unit and integration tests. These test are checking multiple code units as well as how the are connected together.
e.g.seedu.address.logic.LogicManagerTest
-
6.3. Troubleshooting Testing
Problem: HelpWindowTest fails with a NullPointerException.
-
Reason: One of its dependencies,
UserGuide.htmlinsrc/main/resources/docsis missing. -
Solution: Execute Gradle task
processResources.
7. Dev Ops
This section contains the tools we use for software collaboration.
7.1. Build Automation
See UsingGradle.adoc to learn how to use Gradle for build automation.
7.2. Continuous Integration
We use Travis CI and AppVeyor to perform Continuous Integration on our projects. See UsingTravis.adoc and UsingAppVeyor.adoc for more details.
7.3. Making a Release
Here are the steps to create a new release.
-
Update the version number in
MainApp.java. -
Generate a JAR file using Gradle.
-
Tag the repo with the version number. e.g.
v0.1 -
Create a new release using GitHub and upload the JAR file you created.
7.4. Managing Dependencies
A project often depends on third-party libraries. For example, Rolodex depends on the Jackson library for XML parsing. Managing these dependencies can be automated using Gradle. For example, Gradle can download the dependencies automatically, which is better than these alternatives.
a. Include those libraries in the repo (this bloats the repo size)
b. Require developers to download those libraries manually (this creates extra work for developers)
Appendix A: Suggested Programming Tasks to Get Started
Suggested path for new programmers:
-
First, add small local-impact (i.e. the impact of the change does not go beyond the component) enhancements to one component at a time. Some suggestions are given in this section Improving a Component.
-
Next, add a feature that touches multiple components to learn how to implement an end-to-end feature across all components. The section Creating a new command:
remarkexplains how to go about adding such a feature.
A.1. Improving Each Component
Each individual exercise in this section is component-based (i.e. you would not need to modify the other components to get it to work).
Logic Component
Do take a look at the Design: Logic Component section before attempting to modify the Logic component.
|
-
Add a shorthand equivalent alias for each of the individual commands. For example, besides typing
clear, the user can also typecto remove all persons in the list.
Model Component
Do take a look at the Design: Model Component section before attempting to modify the Model component.
|
-
Add a
removeTag(Tag)method. The specified tag will be removed from everyone in the rolodex.
Ui Component
Do take a look at the Design: UI Component section before attempting to modify the UI component.
|
-
Use different colors for different tags inside person cards. For example,
friendstags can be all in grey, andcolleaguestags can be all in red.Before
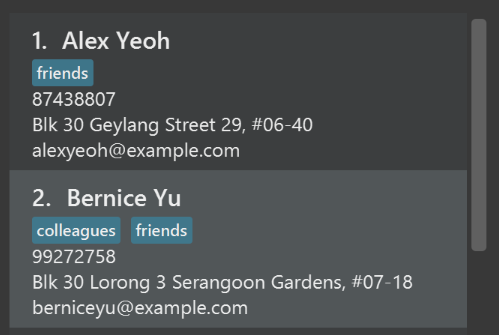
After
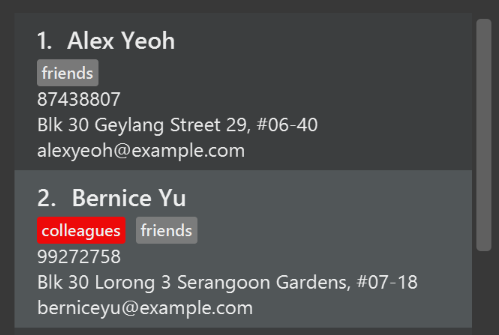
-
Modify
NewResultAvailableEventsuch thatResultDisplaycan show a different style on error (currently it shows the same regardless of errors).Before
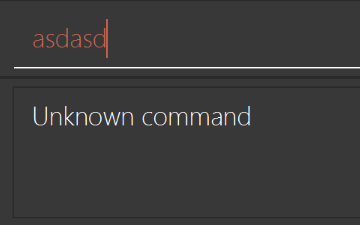
After
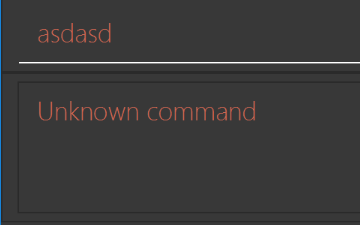
-
Modify the
StatusBarFooterto show the total number of people in the rolodex.Before

After

Storage Component
Do take a look at the Design: Storage Component section before attempting to modify the Storage component.
|
-
Add a new method
backupRolodex(ReadOnlyRolodex), so that the rolodex can be saved in a fixed temporary location.
A.2. Creating a New Command: remark
By creating this command, you will get a chance to learn how to implement a feature end-to-end, touching all major components of the app.
A.2.1. Description
Edits the remark for a person specified in the INDEX.
Format: remark INDEX r/[REMARK]
Examples:
-
remark 1 r/Likes to drink coffee.
Edits the remark for the first person toLikes to drink coffee. -
remark 1 r/
Removes the remark for the first person.
A.2.2. Step-by-step Instructions
[Step 1] Logic: Teach the app to accept 'remark' which does nothing
Let’s start by teaching the application how to parse a remark command. We will add the logic of remark later.
Main:
-
Add a
RemarkCommandthat extendsUndoableCommand. Upon execution, it should just throw anException. -
Modify
RolodexParserto accept aRemarkCommand.
Tests:
-
Add
RemarkCommandTestthat tests thatexecuteUndoableCommand()throws an Exception. -
Add new test method to
RolodexParserTest, which tests that typing "remark" returns an instance ofRemarkCommand.
[Step 2] Logic: Teach the app to accept 'remark' arguments
Let’s teach the application to parse arguments that our remark command will accept. E.g. 1 r/Likes to drink coffee.
Main:
-
Modify
RemarkCommandto take in anIndexandStringand print those two parameters as the error message. -
Add
RemarkCommandParserthat knows how to parse two arguments, one index and one with prefix 'r/'. -
Modify
RolodexParserto use the newly implementedRemarkCommandParser.
Tests:
-
Modify
RemarkCommandTestto test theRemarkCommand#equals()method. -
Add
RemarkCommandParserTestthat tests different boundary values forRemarkCommandParser. -
Modify
RolodexParserTestto test that the correct command is generated according to the user input.
[Step 3] Ui: Add a placeholder for remark in PersonCard
Let’s add a placeholder on all our PersonCard s to display a remark for each person later.
Main:
-
Add a
Labelwith any random text insidePersonListCard.fxml. -
Add FXML annotation in
PersonCardto tie the variable to the actual label.
Tests:
-
Modify
PersonCardHandleso that future tests can read the contents of the remark label.
[Step 4] Model: Add Remark class
We have to properly encapsulate the remark in our ReadOnlyPerson class. Instead of just using a String, let’s follow the conventional class structure that the codebase already uses by adding a Remark class.
Main:
-
Add
Remarkto model component (you can copy fromAddress, remove the regex and change the names accordingly). -
Modify
RemarkCommandto now take in aRemarkinstead of aString.
Tests:
-
Add test for
Remark, to test theRemark#equals()method.
[Step 5] Model: Modify ReadOnlyPerson to support a Remark field
Now we have the Remark class, we need to actually use it inside ReadOnlyPerson.
Main:
-
Add three methods
setRemark(Remark),getRemark()andremarkProperty(). Be sure to implement these newly created methods inPerson, which implements theReadOnlyPersoninterface. -
You may assume that the user will not be able to use the
addandeditcommands to modify the remarks field (i.e. the person will be created without a remark). -
Modify
SampleDataUtilto add remarks for the sample data (delete yourdefault.rldxso that the application will load the sample data when you launch it.)
[Step 6] Storage: Add Remark field to XmlAdaptedPerson class
We now have Remark s for Person s, but they will be gone when we exit the application. Let’s modify XmlAdaptedPerson to include a Remark field so that it will be saved.
Main:
-
Add a new Xml field for
Remark. -
Be sure to modify the logic of the constructor and
toModelType(), which handles the conversion to/fromReadOnlyPerson.
Tests:
-
Fix
validRolodex.rldxsuch that the XML tests will not fail due to a missing<remark>element.
[Step 7] Ui: Connect Remark field to PersonCard
Our remark label in PersonCard is still a placeholder. Let’s bring it to life by binding it with the actual remark field.
Main:
-
Modify
PersonCard#bindListeners()to add the binding forremark.
Tests:
-
Modify
GuiTestAssert#assertCardDisplaysPerson(…)so that it will compare the remark label. -
In
PersonCardTest, callpersonWithTags.setRemark(ALICE.getRemark())to test that changes in thePerson's remark correctly updates the correspondingPersonCard.
[Step 8] Logic: Implement RemarkCommand#execute() logic
We now have everything set up… but we still can’t modify the remarks. Let’s finish it up by adding in actual logic for our remark command.
Main:
-
Replace the logic in
RemarkCommand#execute()(that currently just throws anException), with the actual logic to modify the remarks of a person.
Tests:
-
Update
RemarkCommandTestto test that theexecute()logic works.
A.2.3. Full Solution
See this PR for the step-by-step solution.
Appendix B: User Stories
Priorities: High (must have) - * * *, Medium (nice to have) - * *, Low (unlikely to have) - *
Priority |
As a … |
I want to … |
So that I can… |
|
new user |
see usage instructions |
refer to instructions when I forget how to use the App |
|
user |
add a new person |
key data into my app |
|
user |
edit an existing person |
change details that are no longer pertinent |
|
user |
have a list of intelligent autocomplete options displayed when I make a command |
type commands quicker and easier |
|
user |
delete a person |
remove entries that I no longer need |
|
secure user |
secure my app with a password when not in use |
prevent unauthorized access into my app |
|
efficient user |
perform actions with hotkeys |
increase productivity |
|
private user |
hide private contact details by default |
minimize chance of someone else seeing them by accident |
|
organized user |
delete a specific tag |
remove tags that I no longer need |
|
forgetful user |
store notes about a contact |
remember things pertaining to the contact |
|
lazy user |
use abbreviation when typing commands |
type commands faster |
|
careless user |
be prompted for confirmation when clearing the address book |
avoid accidentally clearing the address book |
|
user with many persons in the rolodex |
sort persons by name |
locate a person easily |
|
lazy user |
delete a person using their name |
remove a contact without having to find their index |
|
advanced user |
amend the storage file manually |
import and export data easily |
Completed User Stories
As a … |
I want to … |
So that I can… |
user with bad spelling |
find a person using close words |
find persons without having to remember the exact spelling |
user |
find a person using its associated tag |
find a tagged group of persons easily |
Appendix C: Use Cases
(For all use cases below, the System is the Rolodex and the Actor is the user, unless specified otherwise)
Use Case: Find Person
MSS
-
User requests to find persons containing a set of name words or tags
-
Rolodex shows a list of persons with names close to or matching the specified query and tags matching the specified query
Use case ends.
Extensions
-
2a. The displayed list is empty
Use case ends.
Use Case: Delete Person
MSS
-
User requests to list persons
-
Rolodex shows a list of persons
-
User requests to delete a specific person in the list
-
Rolodex deletes the person
Use case ends.
Extensions
-
2a. The list is empty.
Use case ends.
-
3a. The given index is invalid.
-
3a1. Rolodex shows an error message.
Use case resumes at step 2.
-
Use Case: Store Person Note
MSS
-
User requests to list person
-
Rolodex shows a list of persons
-
User requests to store note for a specific person in the list
-
Rolodex adds note to the person
Extensions
-
2a. The list is empty.
Use case ends.
-
3a. The given index is invalid.
-
3a1. Rolodex shows an error message.
Use case resumes at step 2.
-
-
3b. A note already exists at given index.
-
3b1. Rolodex requests for confirmation to overwrite note.
-
3b2. User confirms overwrite.
-
3b3. Rolodex overwrites existing note with new note.
-
Use Case: Clear Rolodex
MSS
-
User requests to clear Rolodex
-
Rolodex prompts the user for confirmation
-
User confirms the deletion
-
Rolodex clears the Rolodex
Use case ends.
Extensions
-
3a. User cancels the action.
Use case ends.
Use Case: Editing a Person’s Details
MSS
-
User requests to list persons
-
Rolodex shows a list of persons
-
User requests to edit a specific person in the list
-
Rolodex edits the person with the new data
Use case ends.
Extensions
-
2a. The list is empty.
Use case ends.
-
2b. The list is too long.
-
2b1. User requests to find a person
-
2b2. Rolodex shows a filtered list of persons
-
2b2a. The filtered list is empty
Use case resumes at step 2b1.
-
-
2b3. User requests to edit a specific person in the list
-
2b3a. The given index is invalid.
-
2b3a1. Rolodex shows an error message.
Use case resumes at step 2b2.
-
-
2b3b. The given data is invalid.
-
2b3b1. Rolodex shows an error message.
Use case resumes at step 2b2.
-
-
-
2b4. Rolodex edits the person with the new data
Use case ends.
Use Case: Autocomplete Commands
MSS
-
User hits an alphabet key
-
Rolodex drops down a list of possible commands
-
User requests to select a specific command in the list
-
Rolodex appends the remainder of the command into the input box
Use case ends.
Extensions
-
2a. User continues to type.
Use case resumes at step 2.
-
2b. Rolodex does not display any possible command
Use case ends.
-
3a. User requests to execute the command.
Use case ends.
Use Case: Delete Tag
MSS
-
User requests to delete tag
-
Rolodex shows a list of tags
-
User requests to delete a specific tag in the list
-
Rolodex deletes the tag
Extensions
-
2a. The list is empty.
Use case ends.
-
3a. The given index is invalid.
-
3a1. Rolodex shows an error message.
Use case resumes at step 2.
-
Use Case: Logging into the Rolodex With Login Credentials
MSS
-
User opens the application
-
Rolodex shows a prompt for the login credentials
-
User requests to login with valid credentials
-
Rolodex initializes with the user’s data
Use case ends.
Extensions
-
2a. User does not have an account
-
2a1. User requests to create a new account
-
2a1a. Rolodex creates a new account
Use case resumes at step 2.
-
2a1b. Rolodex failed to create a new account
Use case resumes at step 2a.
-
-
-
2b. User forgot his login credentials
-
2b1. User requests to display the hint for help
-
2b1a. User remembers the correct credentials
Use case resumes at step 3
-
2b1b. User cannot remember the correct credentials
-
2b1ba. User calls support for help
Use case ends.
-
-
-
-
3a. The given login credentials is invalid.
-
3a1. Rolodex shows an error message.
Use case resumes at step 2.
-
Appendix D: Non Functional Requirements
-
Should work on any mainstream OS as long as it has Java
1.8.0_60or higher installed. -
Should be able to hold up to 1000 persons without a noticeable sluggishness in performance for typical usage.
-
A user with above average typing speed for regular English text (i.e. not code, not system admin commands) should be able to accomplish most of the tasks faster using commands than using the mouse.
-
Every command should respond within two seconds.
-
Navigation through the application without a mouse should be easy.
-
Should be able to work offline.
-
Should be free to download.
-
Startup time should be less than 3s.
-
Should be usable by a human who has never seen a command line interface before.
-
Should be usable by a human who has never used a command line interface before.
-
Data should be encrypted when application is not running.
-
A computing professional should be able to manage his/her AddressBook contacts in a fast and efficient manner
-
Commands should be intuitive and easy to learn.
Appendix E: Glossary
Application Programming Interface (API)
Command Line Interface (CLI)
Continuous Integration (CI)
Fuzzy Finding
Java
JavaFX
Lexicographical order
Mainstream OS
Percent-encoding
Private contact detail
Rolodex
Uniform Resource Identifier (URI)
-
Click here to see the full document on URI generic syntax.